The birt plugin is one of the OFBiz plugins.
1. OFBiz Flexible Reports
One of the functionalities of the birt plugin are the "OFBiz Flexible Reports"
There is an anounce with some history in the OFBiz blog: Reporting in Apache OFBiz® and the OFBiz Flexible Reports
1.1. Technical Documentation
1.1.1. Report creation
Introduction
A flexible report is an OFBiz content of FLEXIBLE_REPORT type that allows a final user to make use of the reporting module to obtain flexible reports, ie reports which are created from an entity or view definition and even from a service. A flexible report is created from a Report Master (content REPORT_MASTER), and an optional XML override of the parent form.
Pre-requisite
-
OFBiz framework
-
The Birt plugin
-
The BIRT Report Designer: <<#_using_the_birt_report_designer,Using the Birt Report Designer>>
-
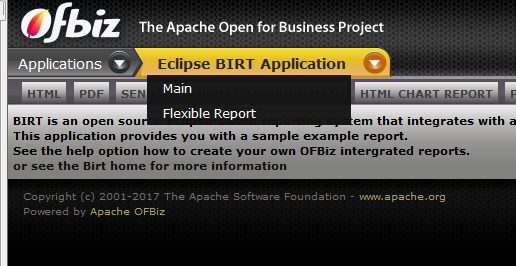
Get to Birt component in OFBiz
-
Click on the "Flexible Report" menu (varies depending on themes)
-
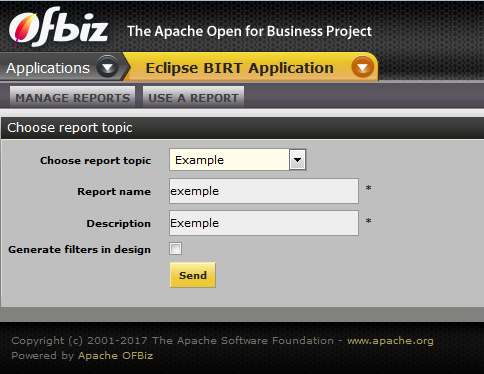
Click on the "Generate report" button, you get to this screen:
-
Fill the form:
-
The list "Choose report topic" will let you choose among predefined report masters your topic of interest.
-
The report name is a simple short name from which the file name will be generated.
-
The description is a short description which will allow you to recognise the report and its topic.
-
The box "Generate filters in design" will add in the design the visualisation of the filters filled in the filtering form.
-
Once the form is validated, OFBiz will show you the "Edit Report" screen.
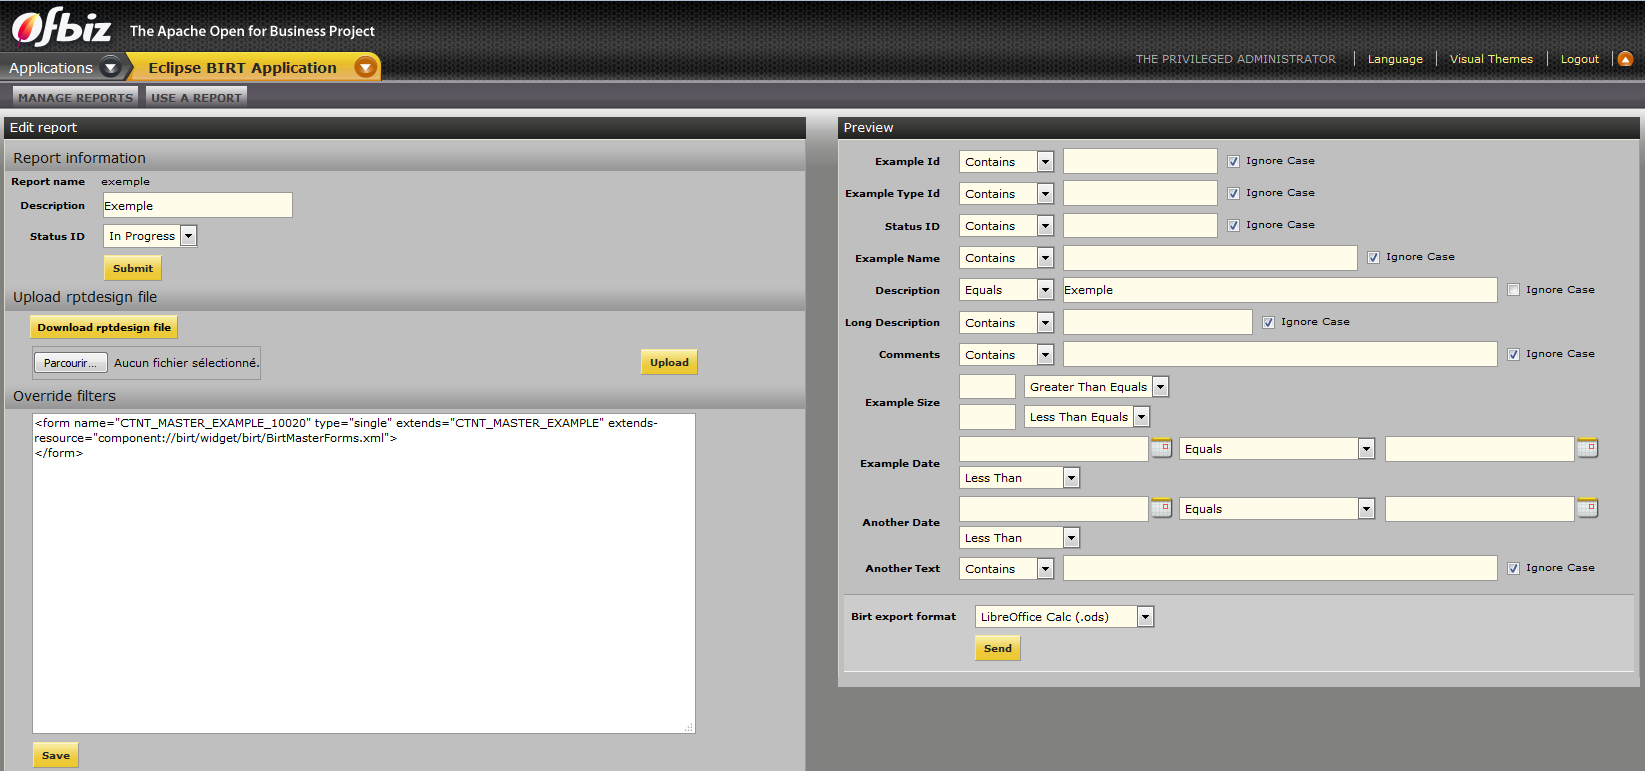
Report information
This first panel allows you to change the report description and status. Actually it does not make sense changing the status to published before having downloaded the .rptdesign file (Birt Report Designer file) from the server (in database), edited and uploaded it back to the server. This is explained in the section below. Changing the status allows users to use your reports. But if you publish without any change the report will render as empty.
The .rptdesign report file: download, edit, upload and publish it
To really use the report you need to download the .rptdesign file from the server in a location from where you can edit it with the BIRT Report Designer. So you need to install first the BIRT Report Designer. Then you can edit the .rptdesign file in the BIRT Report Designer. For that refer to <<#_using_the_birt_report_designer,Using the Birt Report Designer>>.
Editing the downloaded file
Once you installed the BIRT Report Designer and have downloaded the .rptdesign file, you can edit it with the Birt Report Designer. When you have edited it suiting your needs you must upload it to the server for your changes to be taken into account by OFBiz.
This is when things begin to be really interesting. You can then test your report using the "Preview" panel. There you can temporarily filter the result, and use the export format you prefer, once done click "Send". You can then decide to change the report content in the Birt Report Designer again or keep your changes. Once done in the Birt Report Designer, simply select the changed file to upload, and upload it again. You can re-test your changes and continue until you really get what you want! You can then publish the report to allow users to select and use it. There are 2 ways to publish a report from the "Manage reports" screen or directly in the "Report information" panel. We will see the "Manage reports" screen below.
Filters Overriding
You may want to overide the default filters. You can then use the Xml "Override filters" panel to override and personnalize the form, once done click "Save". If you ignore that step, it will NOT prevent the report creation, it is already done, it will just be with the generic filtering form inherited from the master from.
| if no preview is available, it is usually due to a mistake in the master form code. You can edit it in the database. |
Manage reports
The "Manage reports" button get you to a screen which allows to edit (get back to current page), publish or delete a report.
Use a report
Users can select and use any published report from that screen. When they select a report they then get the same "Preview" Panel and can do the same things than in the "Edit Report" screen. Refer users to
1.1.2. Using the Birt Report Designer
Introduction
| this feature will be officially available with the R17.12 branch first release |
The creation of a flexible report goes through a design step of the initial flexible report output under the Birt Report Designer.
This document describes the simplest designs to connect to the data. It is not exhaustive, and simply attempts to cover basic needs. You will find much more documentation online. In our approach, the connection to the data is generated automatically by OFBiz, only the design part of the report will be discussed.
Installing the BIRT Report Designer
Installing the BIRT Report Designer is easy. If you use Eclipse, you can include it as a plugin. You can also install the whole BIRT Report Designer. I use Eclipse but I prefer the second way, to not mix things. So simply download and install the whole all-in-one thing. Or install the plugin if you prefer and use its "Report Design" view which allows to edit .rptdesign files.
| if you installed the BIRT Report Designer under say, a Birt directory, then by default the reports will be accessed from the Birt\workspace\Report Builder directly and this is where you should put the .rptdesign files when downloading them. Your mileage may wary… |
Different areas of the screen and their role
Navigator - Report Builder
This is where you should find the .rptdesign files you downloaded.
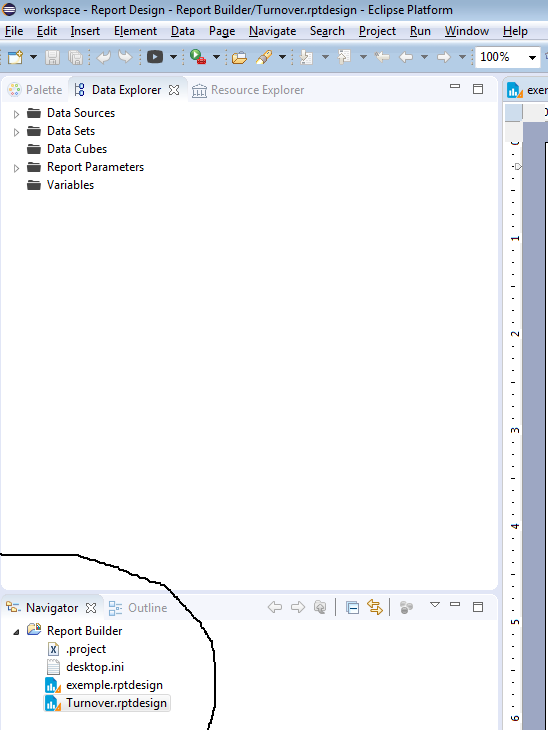
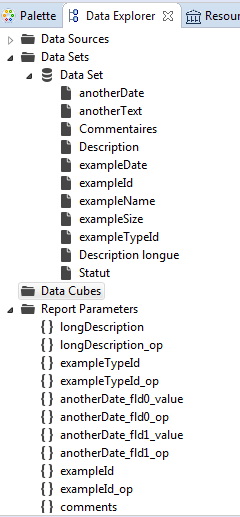
Data Explorer
The Data Explorer defaults to the right of your screen. It gives you access to two things. The data fields available for the report, and the filter fields that can be used for this report.
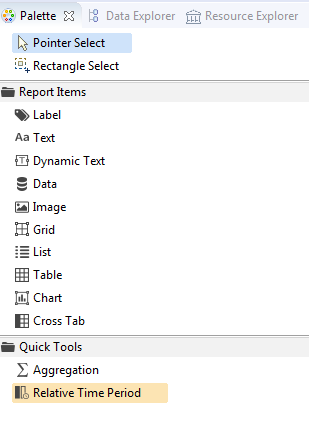
Palette
The palette provides the various tools you can insert in the report. Simple text, image, table of data, layout table, graph, aggregation, etc. All objects are added to the report by drag & drop.
Tabs
At the right bottom of the window is a series of five tabs.
We will use two:
-
Layout, which will allow most of the design.
-
Master Page, which will give access by its owners to standard parameters such as the orientation or size of the report.
The preview is not accessible because it can not be executed outside of OFBiz. Any changes to the scripts will be erased during the upload in OFBiz.
Simple design without break
The simplest possible design is to insert in a table (table in the palette), a part or all of the data set data fields. To do this, right-click on Data Set in the Data Explorer -> Insert in Layout, and then select the fields you want to see appear.
Simple design with break
A break is a collection of data made by Birt from the data. It permits to classify according to a field, and to give details for each category, then to aggregate certain fields, etc.
-
Insert a table (Table) in the report -> OK
-
Right-click on the table -> Edit Data Binding, select all fields
-
In the data set field, change "None" in "Data Set", validate
-
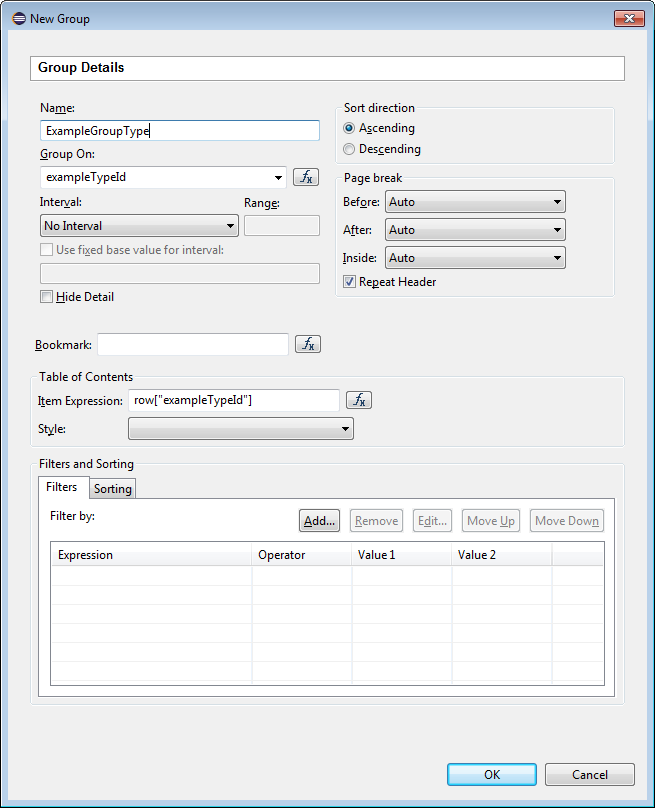
Right-click the table -> Insert Group. Configure your group, eg:
-
Your table then has five lines:
-
A global title line
-
A title line of the group
-
A group detail line
-
A footer of the group
-
A global footer line
-
-
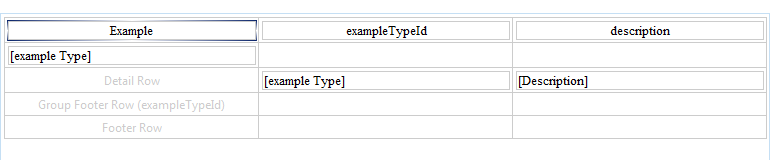
Then insert some elements in the design: in the global header, everything that does not depend on the group, for example the title of the report. In the header of the group, everything that is common to the whole group and that you want to see in its title. In the details, the fields that may appear for each group line. As in the image below, the fields might be inserted by Copy/Paste from the Data Set, and titles via a text element of the palette. You can add lines and columns by right clicking on the end of the line (gray rectangle when the table is selected), etc.
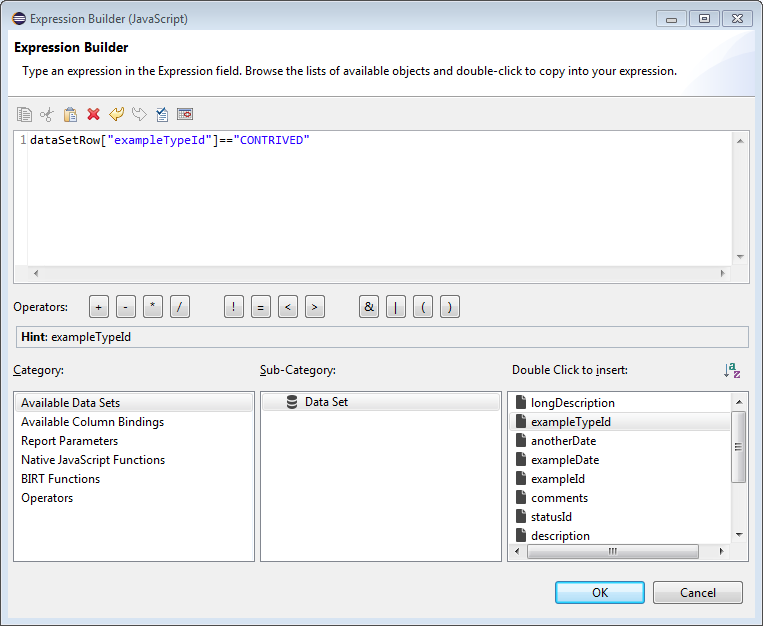
The aggregations may be on the whole table, or only on a group. They are characterized by an expression to aggregate (made up of different data fields), a possible filter on the data lines, and an aggregation function, eg:
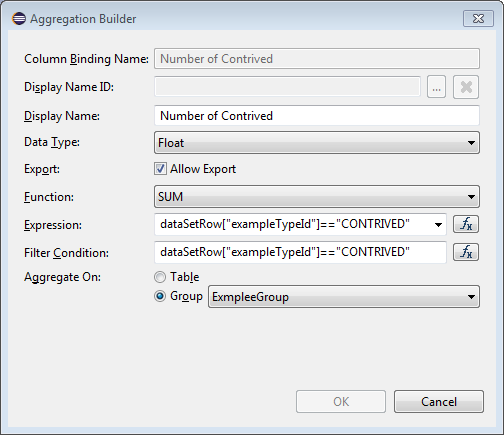
The fx (for expression and filter) buttons are used to open a complex expression construction window. It is possible to use predefined functions, Javascript, data fields, already built aggregations, and so on. This window can also be used by including a data element, which allows to construct non-aggregated data expressions.
Footer lines often allow you to place aggregations, such as sums on the group or table rows, eg

| any unused line must be deleted, otherwise it generates white spaces on the report. |
Layout Management
General settings
Right button leads to Properties Editor tab at bottom. Then click on the Master Page tab, just above. In the Property Editor you will see a series of general properties that will allow you to modify the general form of the report.
Styles
By right-clicking on any item in the table, you have access to the menu of styles. From there they can be edited, applied, created. A style can be applied to the whole picture, to a row or column, to a cell, or to an element in that cell (text, data, …).
1.1.3. Report master creation
Introduction
| this feature will be officially available with the R17.12 branch first release |
A report master is an OFBiz content which allows a user to generate data reports. It defines data connexion, and a general filtering form for data. It can be based on an entity, a dedicated service, or in a wider sense on any shape a data connexion can take and return back a map.
Pre-requisite
-
OFBiz
-
Birt plugin
Report Master based on an entity/view
-
Create or choice a database entity or view
-
Create the general filtering form within the file plugins/birt/widget/birt/BirtMasterForms.xml. The only informations to be changed are entity-name and form name.
    <form name="CTNT_MASTER_EXAMPLE" type="single" extends="AbstractFlexibleReportSearchForm">
        <auto-fields-entity entity-name="Example" default-field-type="find"/>
    </form>
-
Add the informations about this Master in the database using the file plugins/birt/data/BirtMasterData.xml
    <DataResource dataResourceId="DR_MASTER_EXAMPLE" dataResourceTypeId="ELECTRONIC_TEXT" dataTemplateTypeId="FORM_COMBINED" />
    <ElectronicText dataResourceId="DR_MASTER_EXAMPLE">
        <textData><![CDATA[<!--default domain form-->
            <form name="${masterContentId}_${contentId}" type="single" extends="${masterContentId}" extends-    resource="component://birt/widget/birt/BirtMasterForms.xml">
            </form>]]>
        </textData>
    </ElectronicText>
    <Content contentId="CTNT_MASTER_EXAMPLE" contentTypeId="REPORT_MASTER"  dataResourceId="DR_MASTER_EXAMPLE" statusId="CTNT_PUBLISHED" contentName="Example" description="Master Content for Example" />
    <!-- Data retrieval will be done using perform find on entity Example-->
    <ContentAttribute contentId="CTNT_MASTER_EXAMPLE" attrName="Entity" attrValue="Example"/>
The form in the database is the form that will allow users to change form parameters. You can add any field you desire. Some field names are though reserved: reportContentId, overrideFilters, entityViewName, birtContentType.
-
Add in the file content/config/contentEntityLabels.xml the Property that will allow translation for your report master description.
    <property key="Content.description.CTNT_MASTER_EXAMPLE">
        <value xml:lang="en">Example</value>
        <value xml:lang="fr">Exemple</value>
    </property>
Your Report Master is created ! You can now create reports using it.
Report Master based on a service
In plugins/birt/src/main/java/org/apache/ofbiz/birt/flexible/BirtMasterReportServices.java there is 2 sets of dedicated services (see examples there)
-
In each set the first service, will return 4 items:
-
an object of type Map<String, String> called dataMap. Keys: data field names. Values: data types (OFBiz types).
-
an object of type Map<String, String> called fieldDisplayLabels. Keys: data field names. Values: the names displayed to the user. This output is optional, should it be missing, the keys will be displayed.
-
an object of type Map<String, String> called filterMap. Keys: data filtering field names (exact names used for the form fields). Values: data type (OFBiz type). This output is optional, if missing, filters can not be displayed on the report.
-
an object of type Map<String, String> called filterDisplayLabels. Keys: data filtering field names (exact names used for the form fields). Values: names to be displayed to the user. This output is optional, should it be missing, the keys will be displayed.
-
-
The second service will actually get the data. It receives an object (Object type) called reportContext. From this object, you can obtain the map parameters using the following code:
Map<String, Object> parameters = UtilGenerics.checkMap(reportContext.getParameterValue("parameters"));This Map will give access fields of the filtering form. This service will return a list of type List<GenericValue>, containing the data. A Map<String, Object> would also do.
Then,
-
create the parent form in the file plugins/birt/widget/birt/BirtMasterForms.xml. Field names created here must be the names used on the Map parameters of the previous service, and also corresponding to the map filterMap.
    <form name="CTNT_MASTER_TURNOVER" type="single" extends="AbstractFlexibleReportSearchForm">
        <field name="fromDate"><date-time type="date"/></field>
        <field name="thruDate"><date-time type="date"/></field>
        <field name="productCategoryId"><lookup target-form-name="LookupProductCategory"/></field>
        <field name="productStoreId"><lookup target-form-name="LookupProductStore"/></field>
</form>-
Create the master in database following.
    <CustomMethod customMethodId="CM_FB_TURNOVER" customMethodTypeId="FLEXIBLE_BIRT" customMethodName="flexibleReportTurnOver" description="service to resolve invoice for turnover report domain"/>
    <DataResource dataResourceId="DR_MASTER_TURNOVER" dataResourceTypeId="ELECTRONIC_TEXT" dataTemplateTypeId="FORM_COMBINED" />
    <ElectronicText dataResourceId="DR_MASTER_TURNOVER">
        <textData><![CDATA[<!--default domain form-->
            <form name="${masterContentId}_${contentId}" type="single" extends="${masterContentId}" extends-resource="component://birt/widget/birt/BirtMasterForms.xml">
            </form>]]>
        </textData>
    </ElectronicText>
    <Content contentId="CTNT_MASTER_TURNOVER" customMethodId="CM_FB_TURNOVER" contentTypeId="REPORT_MASTER" dataResourceId="DR_MASTER_TURNOVER" statusId="CTNT_PUBLISHED" contentName="Turnover" description="Master Content for TURNOVER domain" />
    <!-- Data retrieval will be done using two service calls. First the contentAttribute Service gives the service that will define which data and label will be retrieved,
    and which filter and label are supported by the report design (default value will call the second service with "prepareField" suffix).
    Second, the custom method gives the service to retrieve all data in the report design.
    Here : flexibleReportTurnOverPrepareFields (customMethodName + "prepareFields") then flexibleReportTurnOver-->
    <ContentAttribute contentId="CTNT_MASTER_TURNOVER" attrName="Service" attrValue="default"/>
The form in the database is the form that will allow users to change form parameters. You can add any field you desire. Some field names are reserved: reportContentId, overrideFilters, entityViewName, birtContentType.
-
Import these data in the base using Webtools XML import (or the longer "gradlew 'ofbiz -l readers=seed,ext' command).
-
Add in the file content/config/contentEntityLabels.xml the Property which will translate your report Master description.
<property key="Content.description.CTNT_MASTER_TURNOVER">
<value xml:lang="en">Turnover (product)</value>
<value xml:lang="fr">Rotation (des stocks)</value>
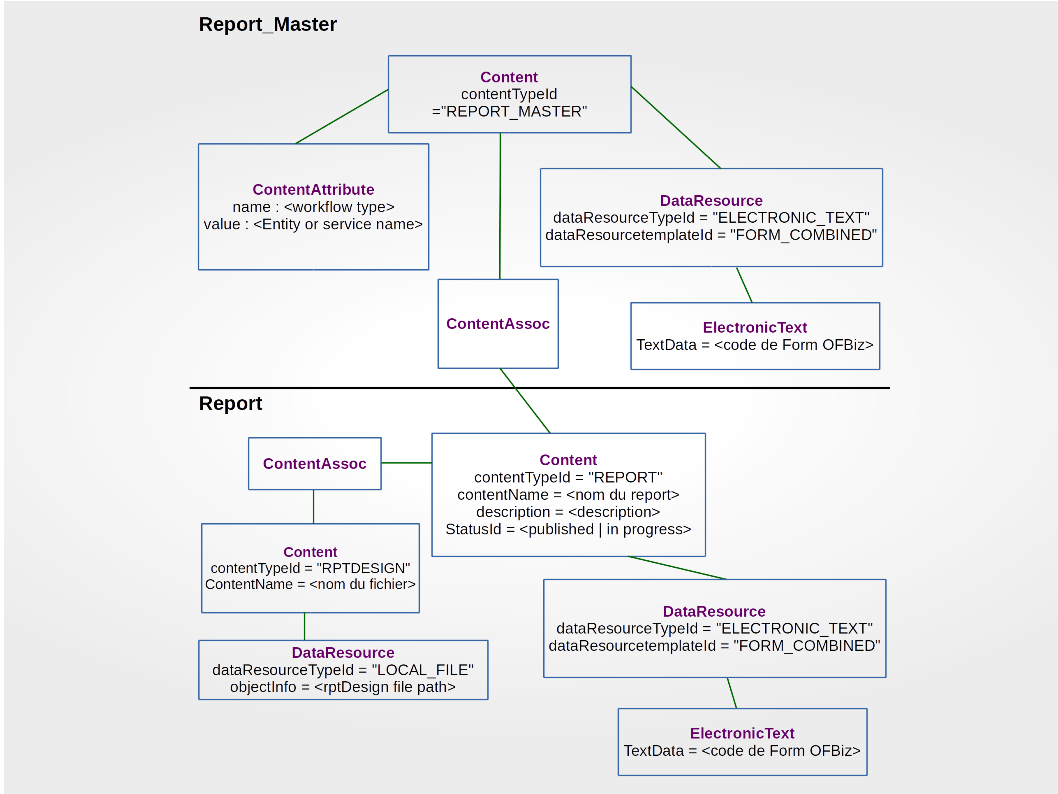
</property>Entities diagram
The following diagram shows the Entities linked with Content to store report_master/report.
1.2. User documentation
1.2.1. Using a flexible report
Introduction
| this feature will be officially available with the R17.12 branch first release |
A flexible report is an OFBiz content of FLEXIBLE_REPORT type which allows the final user to obtain reports using the Birt reporting module. It will be produced at a specific time of your choosing, with your chosen output format, filtering the data with a few parameters defined during report design creation.
Pre-requisite
-
OFBiz
-
The Birt plugin
-
Pre-published reports created from report masters
Using the report
-
go to the Birt component or to another page harboring reports.
-
In the Birt component, click "Use a report".
-
Select your report and hit "Send".
-
The next screen will allow you to filter your data through a set of pre-defined criteria. Should you leave it empty, you will retrieve unfiltered data.
-
Select the desired export format
-
Upon validation, your report is now loaded and can be saved.