1. Introduction
Welcome to the Apache OFBiz developer manual. This manual provides information to help with customizing and developing OFBiz. If you are new to OFBiz and interested in learning how to use it, you may want to start with the "Apache OFBiz User Manual".
OFBiz is a large system composed of multiple subsystems. This manual attempts to introduce the overall architecture and high level concepts, followed by a detailed description of each subsystem. In addition, the manual will cover topics necessary for developers including the development environment, APIs, deployment, security, and so on.
1.1. Main systems
OFBiz at its core is a collection of systems:
-
A web server (Apache Tomcat)
-
A web MVC framework for routing and handling requests.
-
An entity engine to define, load and manipulate data.
-
A service engine to define and control business logic.
-
A widget system to draw and interact with a user interface.
On top of the above mentioned core systems, OFBiz provides:
-
A data model shared across most businesses defining things like orders, invoices, general ledgers, customers and so on.
-
A library of services that operate on the above mentioned data model such as "createBillingAccount" or "updateInvoice" and so on.
-
A collection of applications that provide a user interface to allow users to interact with the system. These applications usually operate on the existing data model and service library. Examples include the "Accounting Manager" and "Order Manager".
-
A collection of optional applications called "plugins" that extend basic functionality and is the main way to add custom logic to OFBiz.
1.2. Components
The basic unit in OFBiz is called "component". A component is at a minimum a folder with a file inside of it called "ofbiz-component.xml"
Every application in OFBiz is a component. For example, the order manager is a component, the accounting manager is also a component, and so on.
By convention, OFBiz components have the following main directory structure:
component-name-here/
├── config/              - Properties and translation labels (i18n)
├── data/                - XML data to load into the database
├── entitydef/           - Defined database entities
├── minilang/            - A collection of scripts written in minilang (deprecated)
├── ofbiz-component.xml  - The OFBiz main component configuration file
├── servicedef           - Defined services.
├── src/
    ├── docs/            - component documentation source
    └── main/groovy/     - A collection of scripts written in Groovy
    └── main/java/       - java source code
    └── test/groovy/     - A collection of scripts written in Groovy
    └── test/java/       - java unit-tests
├── testdef              - Defined integration-tests
├── webapp               - One or more Java webapps including the control servlet
└── widget               - Screens, forms, menus and other widgets
It is apparent from the above directory structure that each OFBiz component is in fact a full application as it contains entities, data, services, user interface, routing, tests, and business logic.
Both core OFBiz applications as well as plugins are nothing more than components. The only difference is that core applications reside in the "applications" folder whereas plugins reside in the "plugins" folder; also OFBiz does not ship with plugins by default.
1.3. Example workflow
Many basic concepts were explained so far. An example would help in putting all of these concepts together to understand the bigger picture. Let us take an example where a user opens a web browser and enters a certain URL and hits the enter key. What happens? It turns out answering this question is not quite simple because lots of things occur the moment the user hits "enter".
To try to explain what happens, take a look at the below diagram. Do not worry if it is not fully understandable, we will go through most of it in our example.
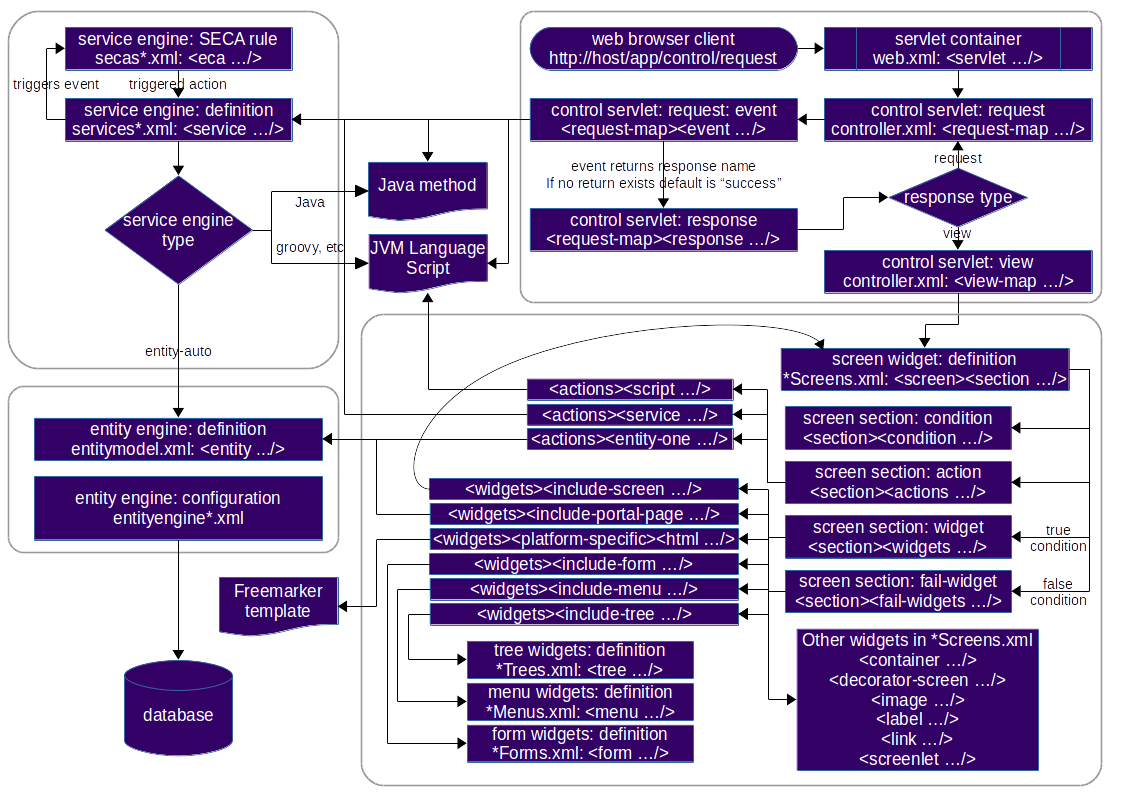
1.3.1. User enters URL
In the first step in our example, the user enters the following URL:
If we break down this URL, we identify the following parts:
-
localhost: Name of the server in which OFBiz is running
-
8443: Default https port for OFBiz
-
accounting: web application name. A web application is something which is defined inside a component
-
control: Tells OFBiz to transfer routing to the control servlet
-
findInvoices: request name inside the control servlet
1.3.2. Control servlet takes over
The Java Servlet Container (tomcat) re-routes incoming requests through web.xml to a special OFBiz servlet called the control servlet. The control servlet for each OFBiz component is defined in controller.xml under the webapp folder.
The main configuration for routing happens in controller.xml. The purpose of this file is to map requests to responses.
Request Map
A request in the control servlet might contain the following information:
-
Define communication protocol (http or https) as well as whether authentication is required.
-
Fire up an event which could be either a piece of code (like a script) or a service.
-
Define a response to the request. A response could either be another request or a view map.
So in this example, the findInvoices request is mapped to a findInvoices view.
View Map
A view map maps a view name to a certain view-type and a certain location.
View types can be one of:
-
screen: A screen widget which translates to normal HTML.
-
screenfop: A PDF screen designed with Apache FOP based constructs.
-
screencsv: A comma separated value output report.
-
screenxml: An XML document.
-
simple-content; A special MIME content type (like binary files).
-
ftl: An HTML document generated directly from a FreeMarker template.
-
screenxls: An Excel spreadsheet.
In the findInvoices example, the view-map type is a normal screen which is mapped to the screen: component://accounting/widget/InvoiceScreens.xml#FindInvoices
1.3.3. Widget rendered
Once the screen location is identified and retrieved from the previous step, the OFBiz widget system starts to translate the XML definition of the screen to actual HTML output.
A screen is a collection of many different things and can include:
-
Other screens
-
Decorator screens
-
Conditional logic for hiding / showing parts of the screen
-
data preparation directives in the <action> tag
-
Forms
-
Menus
-
Trees
-
Platform specific code (like FreeMarker for HTML output)
-
Others (portals, images labels etc …)
Continuing the example, the FindInvoices screen contains many details including two forms. One form is for entering invoice search fields and the other form displays search results.
1.4. The Apache OFBiz documentation system
1.4.1. Overview
there are two supports for OFbiz documentation, the wiki and some mains documents (in pdf and html format)
-
user-manual
-
developer-manual
-
documentation_guidelines
-
README
Asciidoc
The OFBiz documents are generated from a number of Asciidoc files. In general the files are stored on each component
in the 'src/docs/asciidoc' directories.
The general main documents include all files from component.
The manuals and guidelines documents are located in docs/asciidoc directories, and REAME.adoc is in root directory.
Help link in the OFBiz user interface, are link to the user-manual generated by buildbot process from Apache OFBiz community. It’s possible to change a property in OFBiz to have link to your own generation.
For details about asciidoc rules used in Apache OFBiz have a look to Documentation Guidelines
Application components
All main files of each component are included in user-manual.adoc
Framework components
All main files of each component are included in developer-manual.adoc except for webtools which is included in user-manual
Plugins
For the main files of the plugin components, there are two ways to read them.
On the one hand, the plugin documentation generation process generates one document per plugin, so that you can see the list of documents in the pluginsdoc directory and thus read each of them;
On the other hand, each plugin master file is included in the plugin chapter of the user manual or developer manual, depending on whether the plugin is "technical" or "functional".
Wiki
Wiki is the second way to contribute to the documentation. Detail on how to Help for providing help content is on the wiki
Most of wiki page has been or will be migrated to the asciidoc pages, but, as wiki is more easier to be update (update existing page or create new one) the two system will continue to exist and live.
1.4.2. Contributing a new help screen, a few steps.
Documentation Guidelines is the first doc to read to be able to contribute to documentation and/or help.
If you are looking for asciidoc files format examples, please look at the following files:
-
An example for a chapter of a component at: applications/humanres/src/docs/asccidoc/_include/hr-intro.adoc
-
An example of a help screen: applications/humanres/src/docs/asccidoc/_include/HELP-hr-main.adoc
Screens
If you would like to create a new help for a certain screen, you need to do the following:
-
Write documentation in a functional point of view and in a process perspective.
-
Each title (in all level) generate in html an anchor, so starting point of the help should be a title.
-
Take the anchor generated (something like _the_title , with only lowercase), for example by looking in the html file generated.
-
In the screen add a
<set fieldforhelpAnchorwith anchor generated as value.
1.4.3. Internationalization of the help system
Currently documentation is only in English (except for 3 or 4 files, not included).
In near future, there will be a solution to be able to have documentation/help in multiple languages, a jira (OFBIZ-12030) is open of that.
The switching between locale will be completely automatic (depending on OFBiz user local)
2. Web Framework
3. Web Applications
The OFBiz webapp is one of the core framework components. It is tightly integrated with other framework components.
3.1. Cross-domains Single Sign On (SSO)
|
As more explained at bottom of https://issues.apache.org/jira/browse/OFBIZ-11594, the introduction of "the SameSite attribute set to 'strict' for all cookies" with https://issues.apache.org/jira/browse/OFBIZ-11470 prevents the internal Single Sign On feature. There are ways to make it available as explained at bottom of https://issues.apache.org/jira/browse/OFBIZ-11594. It’s not implemented OOTB, but it’s not hard work. |
In some cases you need to split the OFBiz applications on different servers, and possibly in production on different domains. This can happen for different reasons, most often for performance reason.
As it’s annoying to give each time a credential when changing from an OFBiz application to another on the same server, the same applies when changing from an OFBiz application to another on another domain.
To prevent that on the same server, the ExternalLoginKey mechanism is used. The cross-domains SSO feature allows to navigate from a domain to another with automated SSO.
It based on 3 technologies:
- JWT
- CORS
- Ajax
-
Ajax, now well known I guess, in OFBiz we use jQuery for that.
The mechanism is simple.
-
When an user log in in an application (webApp) a webappName.securedLoginId cookie is created. This cookie will be used by the mechanism to know the current logged in user. Note that all webappName.securedLoginId cookies are deleted when the user session is closed or time out. Hence (apart also using an intrinsically secured cookie) the mechanim is secured, even on shared machines. Of course if people are sharing a machine during their sessions, things could get complicated. This unlikely later case is not taken in account.
-
The user is given a JavaScript link which passes the URL to reach and the calling webapp name to the sendJWT() Ajax function.
-
The sendJWT() Ajax function calls the loadJWT() Ajax function which in turn calls the CommonEvents::loadJWT method through the common controller.
-
The CommonEvents::loadJWT method uses the calling webapp name to retrieve the userLoginId from the secured webappName.securedLoginId cookie, creates a JWT containing the userLoginId, and returns it to the loadJWT() Ajax function.
-
Then the sendJWT() Ajax function sends an Authorization header containing the JWT to the URL to reach. At this stage, if all things are correct, the flow leaves the source side.
-
Last but not least. To make this work you have to set the security.internal.sso.enabled and security.token.key SystemProperty entities locally and on trunk demo server
-
A CORS policy is needed. Without it, the Authorization token containing the JWT will be rejected. It’s a simple policy but you need to strictly define the authorized domains. Never use the lazy "*" for domains (ie all domains), else the preflight request will not work. Here is an example for Apache HTTPD (domain value is "https://localhost:8443" for official OFBiz demo):
Header set Access-Control-Allow-Origin domain
Header set Access-Control-Allow-Headers "Authorization"
Header set Access-Control-Allow-Credentials "true"-
The checkJWTLogin preprocessor, similar to the checkExternalLoginKey, intercepts the JWT, checks it and if all is OK signs the user on. That’s it !
In the example component, the FormWidgetExamples screen contains 2 new fields in the LinksExampleForm which demonstrate the use from a local instance to the trunk demo instance.
If you are interested in more details you may refer to https://issues.apache.org/jira/browse/OFBIZ-10307
3.2. Control Servlet
3.2.1. Requests
3.2.2. Views
4. The Entity Engine.
4.1. Entity Engine guide.
4.2. Entity Engine Configuration Guide.
4.3. Entity overview.
4.4. Entities
4.4.1. Standard Entities
4.4.2. View Entities
4.4.3. Extended Entities
4.4.4. Dynamic View Entities
4.5. XML Data
4.6. The OFBiz Datafiles
4.6.1. Intoduction
There is a data import tool in OFBiz called the DataFile tool.
It uses XML files that describe flat file formats (including character delimited, fixed width, etc) and parses the flat files
based on those definitions. So, by design it is somewhat like the Entity Engine.
It uses a generic object to represent a row in the flat file.
It includes features like a line type code for each line and can support hierarchical flat files
(ie where parent/child relationships are implied by sub-records).
The code is in the ofbiz/framework/datafile directory, and there is an XSD there to describe how the data file definition XML file should look.
The DataFile has a web page in WebTools to parse data files and generate entity xml files (that can be imported in OFBiz) from them, and to do in/outtesting.
both the import of fixed width flat files and character delimited files are implemented.
4.6.2. Definitions
-
File : this is an xml file that contains one or more "Data File Definition"s;
-
the grammar of the file is defined in framework/datafile/dtd/datafile.xsd
-
-
Data file Definition : the definition of a data file structure (e.g. names/types of the fields/columns in a "Data File";
-
the same "Data File" could have more than one "Data File Definition"s (e.g. the definitions could consider different subsets of all the fields available in the data file).
-
-
Data file : the text file that contains all the data (a fixed width or a character delimited text file)
4.6.3. How to use the "Work With Data Files" screen in the Webtools application
Prerequisites: a definition file (containing the fields' definition of the data file) and a data file (containing the data you want to parse/import) should be available in the OFBiz server.Steps:
-
connect to the Webtools application
-
go to the "Work With Data Files" screen
-
enter the path to the your definition file in the "Definition Filename or URL" input field
-
click on the submit button>
-
the "Data File Definition Name" input field will be changed into a drop down box containing all the definitions available in the definition file
-
select the definition you want to use from the drop down box>
-
enter the path to the your data file in the "Data Filename or URL" input field
-
if you want to generate an entity xml file that can be later imported in OFBiz, enter a path for it in the "Save to entity xml file:
-
input field and click on the submit button; the file will be created
(see the paragraph "Tips to create Entity Xml Files" for more details)
<field name="productId" type="String">
            </field>
4.6.4. Examples
Sample fixed width CSV file posreport.csv to be imported:
021196033702    ,5031BB GLITTER GLUE PENS BRIGH  ,1           ,5031BB      ,       1,     299,
021196043121    ,BB4312 WONDERFOAM ASSORTED      ,1           ,BB4312      ,       1,     280,
021196055025    ,9905BB  PLUMAGE MULTICOLOURED   ,1           ,9905BB      ,       4,     396,
Sample xml definition file for importing select columns
    <data-files xsi:noNamespaceSchemaLocation="http://ofbiz.apache.org/dtds/datafiles.xsd" xmlns:xsi="http://www.w3.org/2001/XMLSchema-instance">
        <data-file name="posreport" separator-style="fixed-length" type-code="text">
            <record name="tillentry" limit="many">
                <field name="tillCode" type="String" length="16" position="0"></field>
                <field name="name" type="String" length="32" position="17"></field>
                <field name="prodCode" type="String" length="12" position="63"></field>
                <field name="quantity" type="String" length="8" position="76"></field>
                <field name="totalPrice" type="String" length="8" position="85"></field>
            </record>
        </data-file>
</data-files> <data-files xsi:noNamespaceSchemaLocation="http://ofbiz.apache.org/dtds/datafiles.xsd" xmlns:xsi="http://www.w3.org/2001/XMLSchema-instance">
<data-file name="stockdata" separator-style="fixed-record" type-code="text" record-length="768">
<record name="stockdataitem" limit="many">
<field name="barcode" type="NullTerminatedString" length="12" position="0"></field>
<field name="prodCode" type="NullTerminatedString" length="12" position="68"></field>
<field name="price" type="LEInteger" length="4" position="80"></field>
<field name="name" type="NullTerminatedString" length="30" position="16"></field>
</record>
</data-file>
</data-files>Procedure:
In the interface enter something like:
-
Definition Filename or URL: posschema.xml
-
Data File Definition Name: posreport
-
Data Filename or URL: posreport.csv
4.7. Entity engine configuration
4.8. Supported databases
4.9. Data Model Changes
The Apache OFBiz® Project Release trunk
Apache OFBiz follows The Universal Data Model by Len Silverston, with a grain of salt.
The following file contains information about the data model changes in the Apache OFBiz. The detailed description of migration scripts specified here can be found at Revisions Requiring Data Migration - upgrade ofbiz page.
4.9.1. Changes with OFBiz Trunk (Upcoming Branch)
Entity Changes
Added new entities
-
ProdPromoCodeContactMech
-
OrderDenylist
-
OrderDenylistType
-
AgreementStatus
Removed/Deprecate 3 entities
-
ProductPromoCodeEmail
-
OrderBlacklist
-
OrderBlacklistType
Field Changes
| Entity | Field | Action | IsPK | Revision |
|---|---|---|---|---|
GlXbrlClass |
parentGlXbrlClassId |
Added |
No |
36a123a |
Agreement |
statusId |
Added |
No |
da8817d |
GeoPoint |
latitude |
Modified |
No |
d288e12 |
GeoPoint |
longitude |
Modified |
No |
d288e12 |
If in the list above fields are mentioned where 'IsPK' = yes, we advice to follow steps below for a successful upgrade:
-
Stop your OFBiz implementation
-
Go to the entity definition in the appropriate entitymodel.xml file
-
Disable temporarily the prim-key reference of the added field, and save the file
-
Restart the OFBiz implementation
-
Check with your RDBMS client that the new field is present in the table
-
Add values for the field in the table (if appropriate)
-
Stop the OFBiz implementation
-
Go back to the definition in the appropriate entitymodel.xml file
-
Enable the temporary disabled prim-key reference of the added field, and save the file
-
Check with your RDBMS client that the new field is part of the primary key defintion of the table
Migration Scripts
-
Migration service migrateProductPromoCodeEmail is implemented to migrate the ProductPromoCodeEmail entity to ProductPromoCodeContactMech.
(More detail at OFBIZ-5426)
4.9.2. Changes with OFBiz 17
Field types id-ne, id-long-ne & id-vlong-ne has been removed. Use id, id-long and id-vlong
instead (detailed description at OFBIZ-9351).
Entity Changes
No changes
Field Changes
| Entity | Field | Action | IsPK | Revision |
|---|---|---|---|---|
MarketingCampaignPrice |
fromDate |
Added |
Yes |
R1805961 |
MarketingCampaignPrice |
thruDate |
Added |
No |
R1805961 |
MarketingCampaignPromo |
fromDate |
Added |
Yes |
R1805961 |
MarketingCampaignPromo |
thruDate |
Added |
No |
R1805961 |
MarketingCampaignRole |
fromDate |
Added |
Yes |
R1805961 |
MarketingCampaignRole |
thruDate |
Added |
No |
R1805961 |
Product |
manufacturerPartyId |
Removed |
No |
R1804408 |
SecurityGroupPermission |
fromDate |
Added |
Yes |
R1812383 |
SecurityGroupPermission |
thruDate |
Added |
No |
R1812383 |
Migration Scripts
-
Updated sql-type for date-time and time field in fieldtypemysql.xml file at commit R1793300
Update msyql sql-type for datetime field-type to support Fractional Seconds in Time Values Please upgrade mysql to at least 5.6.4 or higher.
After upgrade rungenerateMySqlFileWithAlterTableForTimestampsservice, groupName is required field for this service.
It will generate sql file with alter query statement for date-time and time field at location$\{ofbiz.home}/runtime/tempfiles/.sql
You can use execute sql statement from any of the mysql batch command.
4.9.3. Changes between OFBiz 9 to OFBiz 16
Entity Changes
Added 77 new entities
-
JobRequisition
-
ProductAverageCostType
-
WorkEffortSurveyAppl
-
WorkEffortIcalData
-
WebSiteContactList
-
WebAnalyticsType
-
WebAnalyticsConfig
-
UserLoginSecurityQuestion
-
UomGroup
-
TrainingRequest
-
ThirdPartyLogin
-
TestFieldType
-
TestingSubtype
-
TestingStatus
-
TestingRemoveAll
-
TestingItem
-
TestingCrypto
-
SystemProperty
-
ShipmentGatewayUsps
-
ShipmentGatewayUps
-
ShipmentGatewayFedex
-
ShipmentGatewayDhl
-
ShipmentGatewayConfig
-
ShipmentGatewayConfigType
-
ReturnContactMech
-
QuoteNote
-
ProductPromoContent
-
ProductPromoContentType
-
ProductGroupOrder
-
ProductCostComponentCalc
-
CostComponentCalc
-
PayPalPaymentMethod
-
PaymentGroupType
-
PaymentGroup
-
PaymentGroupMember
-
PaymentGatewayConfig
-
PaymentGatewayConfigType
-
PaymentGatewayWorldPay
-
PaymentGatewaySecurePay
-
PaymentGatewaySagePay
-
PaymentGatewayOrbital
-
PaymentGatewayEway
-
PaymentGatewayCyberSource
-
PaymentGatewayAuthorizeNet
-
PaymentGatewayIDEAL
-
PaymentContentType
-
PaymentContent
-
OAuth2LinkedIn
-
OAuth2GitHub
-
JobManagerLock
-
JobInterviewType
-
JobInterview
-
JavaResource
-
InvoiceNote
-
InvoiceItemAssocType
-
InvoiceItemAssoc
-
InvoiceContentType
-
InvoiceContent
-
GlAccountCategoryType
-
GlAccountCategoryMember
-
GlAccountCategory
-
GitHubUser
-
FixedAssetTypeGlAccount
-
FacilityContent
-
ExcelImportHistory
-
EmplLeaveReasonType
-
EbayShippingMethod
-
EbayConfig
-
CountryAddressFormat
-
ContentSearchResult
-
ContentSearchConstraint
-
ContentKeyword
-
CheckAccount
-
AgreementFacilityAppl
-
AgreementContentType
-
AgreementContent
Removed 8 entities
-
DepreciationMethod
-
FixedAssetMaintMeter
-
OagisMessageErrorInfo
-
OagisMessageInfo
-
SalesOpportunityTrackingCode
-
SimpleSalesTaxLookup
-
TestBlob
-
WorkEffortAssignmentRate
Field Changes
| Entity | Field | Action | IsPK | Revision |
|---|---|---|---|---|
AcctgTransAttribute |
attrDescription |
Added |
No |
NA |
AcctgTransEntry |
inventoryItemId |
Added |
No |
NA |
AcctgTransTypeAttr |
description |
Added |
No |
NA |
BenefitType |
parentTypeId |
Added |
No |
NA |
BenefitType |
hasTable |
Added |
No |
NA |
BudgetAttribute |
attrDescription |
Added |
No |
NA |
BudgetItemAttribute |
attrDescription |
Added |
No |
NA |
BudgetItemTypeAttr |
description |
Added |
No |
NA |
BudgetStatus |
changeByUserLoginId |
Added |
No |
NA |
BudgetTypeAttr |
description |
Added |
No |
NA |
CommunicationEventRole |
statusId |
Added |
No |
NA |
CommunicationEventType |
contactMechTypeId |
Added |
No |
NA |
ContactListCommStatus |
partyId |
Added |
No |
NA |
ContactListCommStatus |
messageId |
Added |
No |
NA |
ContactListCommStatus |
changeByUserLoginId |
Added |
No |
NA |
ContactMechAttribute |
attrDescription |
Added |
No |
NA |
ContactMechTypeAttr |
description |
Added |
No |
NA |
DeductionType |
parentTypeId |
Added |
No |
NA |
DeductionType |
hasTable |
Added |
No |
NA |
DocumentAttribute |
attrDescription |
Added |
No |
NA |
DocumentTypeAttr |
description |
Added |
No |
NA |
EmploymentApp |
approverPartyId |
Added |
No |
NA |
EmploymentApp |
jobRequisitionId |
Added |
No |
NA |
EmploymentAppSourceType |
parentTypeId |
Added |
No |
NA |
EmploymentAppSourceType |
hasTable |
Added |
No |
NA |
EmplPositionClassType |
parentTypeId |
Added |
No |
NA |
EmplPositionClassType |
hasTable |
Added |
No |
NA |
EmplPositionType |
parentTypeId |
Added |
No |
NA |
EmplPositionType |
hasTable |
Added |
No |
NA |
EmplPositionType |
partyId |
Removed |
No |
NA |
EmplPositionType |
roleTypeId |
Removed |
No |
NA |
FinAccountAttribute |
attrDescription |
Added |
No |
NA |
FinAccountTransAttribute |
attrDescription |
Added |
No |
NA |
FinAccountTrans |
glReconciliationId |
Added |
No |
NA |
FinAccountTrans |
statusId |
Added |
No |
NA |
FinAccountTransTypeAttr |
description |
Added |
No |
NA |
FinAccountTypeAttr |
description |
Added |
No |
NA |
FinAccountStatus |
changeByUserLoginId |
Added |
No |
NA |
FixedAsset |
acquireOrderId |
Added |
No |
NA |
FixedAsset |
acquireOrderItemSeqId |
Added |
No |
NA |
FixedAssetAttribute |
attrDescription |
Added |
No |
NA |
FixedAssetTypeAttr |
description |
Added |
No |
NA |
GlAccount |
externalId |
Added |
No |
NA |
GlAccount |
openingBalance |
Added |
No |
NA |
GlReconciliation |
createdDate |
Added |
No |
NA |
GlReconciliation |
lastModifiedDate |
Added |
No |
NA |
GlReconciliation |
statusId |
Added |
No |
NA |
GlReconciliation |
openingBalance |
Added |
No |
NA |
InventoryItemAttribute |
attrDescription |
Added |
No |
NA |
InventoryItemStatus |
changeByUserLoginId |
Added |
No |
NA |
InventoryItemTypeAttr |
description |
Added |
No |
NA |
InvoiceAttribute |
attrDescription |
Added |
No |
NA |
InvoiceItemAttribute |
attrDescription |
Added |
No |
NA |
InvoiceItemTypeAttr |
description |
Added |
No |
NA |
InvoiceStatus |
changeByUserLoginId |
Added |
No |
NA |
InvoiceTypeAttr |
description |
Added |
No |
NA |
InvoiceTermAttribute |
attrDescription |
Added |
No |
NA |
JobSandbox |
currentRetryCount |
Added |
No |
NA |
JobSandbox |
tempExprId |
Added |
No |
NA |
JobSandbox |
currentRecurrenceCount |
Added |
No |
NA |
JobSandbox |
maxRecurrenceCount |
Added |
No |
NA |
JobSandbox |
jobResult |
Added |
No |
NA |
OrderAdjustment |
amountAlreadyIncluded |
Added |
No |
NA |
OrderAdjustment |
isManual |
Added |
No |
NA |
OrderAdjustment |
oldPercentage |
Added |
No |
NA |
OrderAdjustment |
oldAmountPerQuantity |
Added |
No |
NA |
OrderAdjustment |
lastModifiedDate |
Added |
No |
NA |
OrderAdjustment |
lastModifiedByUserLogin |
Added |
No |
NA |
OrderAdjustmentAttribute |
attrDescription |
Added |
No |
NA |
OrderAdjustmentTypeAttr |
description |
Added |
No |
NA |
OrderAttribute |
attrDescription |
Added |
No |
NA |
OrderItem |
supplierProductId |
Added |
No |
NA |
OrderItem |
cancelBackOrderDate |
Added |
No |
NA |
OrderItem |
changeByUserLoginId |
Added |
No |
NA |
OrderItemAttribute |
attrDescription |
Added |
No |
NA |
OrderItemShipGroup |
facilityId |
Added |
No |
NA |
OrderItemShipGroup |
estimatedShipDate |
Added |
No |
NA |
OrderItemShipGroup |
estimatedDeliveryDate |
Added |
No |
NA |
OrderItemShipGrpInvRes |
priority |
Added |
No |
NA |
OrderItemShipGrpInvRes |
oldPickStartDate |
Added |
No |
NA |
OrderItemTypeAttr |
description |
Added |
No |
NA |
OrderTermAttribute |
attrDescription |
Added |
No |
NA |
OrderPaymentPreference |
track2 |
Added |
No |
NA |
OrderPaymentPreference |
swipedFlag |
Added |
No |
NA |
OrderPaymentPreference |
lastModifiedDate |
Added |
No |
NA |
OrderPaymentPreference |
lastModifiedByUserLogin |
Added |
No |
NA |
OrderShipment |
shipGroupSeqId |
Added |
No |
NA |
OrderTypeAttr |
description |
Added |
No |
NA |
PartyAcctgPreference |
orderSequenceEnumId |
Removed |
No |
NA |
PartyAcctgPreference |
quoteSequenceEnumId |
Removed |
No |
NA |
PartyAcctgPreference |
invoiceSequenceEnumId |
Removed |
No |
NA |
PartyAcctgPreference |
oldOrderSequenceEnumId |
Added |
No |
NA |
PartyAcctgPreference |
oldQuoteSequenceEnumId |
Added |
No |
NA |
PartyAcctgPreference |
oldInvoiceSequenceEnumId |
Added |
No |
NA |
PartyAcctgPreference |
orderSeqCustMethId |
Added |
No |
NA |
PartyQual |
infoString |
Removed |
No |
NA |
PartyQual |
institutionInternalId |
Removed |
No |
NA |
PartyQual |
institutionPartyId |
Removed |
No |
NA |
PartyQual |
partyQualId |
Removed |
No |
NA |
PartyRate |
percentageUsed |
Added |
No |
NA |
PartyRate |
rate |
Removed |
No |
NA |
PartyResume |
contentId |
Added |
No |
NA |
PaymentAttribute |
attrDescription |
Added |
No |
NA |
PaymentGatewayResponse |
gatewayCvResult |
Added |
No |
NA |
PaymentMethod |
finAccountId |
Added |
No |
NA |
PaymentTypeAttr |
description |
Added |
No |
NA |
PerfRatingType |
parentTypeId |
Added |
No |
NA |
PerfRatingType |
hasTable |
Added |
No |
NA |
PerfReview |
payHistoryRoleTypeIdTo |
Removed |
No |
NA |
PerfReview |
payHistoryRoleTypeIdFrom |
Removed |
No |
NA |
PerfReview |
payHistoryPartyIdTo |
Removed |
No |
NA |
PerfReview |
payHistoryPartyIdFrom |
Removed |
No |
NA |
PerfReview |
payHistoryFromDate |
Removed |
No |
NA |
PerfReviewItemType |
parentTypeId |
Added |
No |
NA |
PerfReviewItemType |
hasTable |
Added |
No |
NA |
PersonTraining |
trainingRequestId |
Added |
No |
NA |
PersonTraining |
workEffortId |
Added |
No |
NA |
PersonTraining |
approverId |
Added |
No |
NA |
PersonTraining |
approvalStatus |
Added |
No |
NA |
PersonTraining |
reason |
Added |
No |
NA |
PostalAddress |
houseNumber |
Added |
No |
NA |
PostalAddress |
houseNumberExt |
Added |
No |
NA |
PostalAddress |
cityGeoId |
Added |
No |
NA |
PostalAddress |
municipalityGeoId |
Added |
No |
NA |
PostalAddress |
geoPointId |
Added |
No |
NA |
PosTerminal |
terminalName |
Added |
No |
NA |
PosTerminalInternTx |
reasonEnumId |
Added |
No |
NA |
Product |
releaseDate |
Added |
No |
NA |
Product |
originalImageUrl |
Added |
No |
NA |
Product |
inventoryItemTypeId |
Added |
No |
NA |
Product |
shippingWeight |
Added |
No |
NA |
Product |
productWeight |
Added |
No |
NA |
Product |
diameterUomId |
Added |
No |
NA |
Product |
productDiameter |
Added |
No |
NA |
Product |
virtualVariantMethodEnum |
Added |
No |
NA |
Product |
defaultShipmentBoxTypeId |
Added |
No |
NA |
Product |
lotIdFilledIn |
Added |
No |
NA |
Product |
orderDecimalQuantity |
Added |
No |
NA |
Product |
weight |
Removed |
No |
NA |
Product |
taxCategory |
Removed |
No |
NA |
Product |
taxVatCode |
Removed |
No |
NA |
Product |
taxDutyCode |
Removed |
No |
NA |
ProductAttribute |
attrDescription |
Added |
No |
NA |
ProductAverageCost |
productAverageCostTypeId |
Added |
No |
NA |
ProductAverageCost |
facilityId |
Added |
No |
NA |
ProductContent |
sequenceNum |
Added |
No |
NA |
ProductKeyword |
keywordTypeId |
Added |
No |
NA |
ProductKeyword |
statusId |
Added |
No |
NA |
ProductRole |
sequenceNum |
Added |
No |
NA |
ProductStore |
balanceResOnOrderCreation |
Added |
No |
NA |
ProductStore |
defaultTimeZoneString |
Added |
No |
NA |
ProductStore |
oldStyleSheet |
Added |
No |
NA |
ProductStore |
oldHeaderLogo |
Added |
No |
NA |
ProductStore |
oldHeaderRightBackground |
Added |
No |
NA |
ProductStore |
oldHeaderMiddleBackground |
Added |
No |
NA |
ProductStore |
styleSheet |
Removed |
No |
NA |
ProductStore |
headerLogo |
Removed |
No |
NA |
ProductStore |
headerRightBackground |
Removed |
No |
NA |
ProductStore |
headerMiddleBackground |
Removed |
No |
NA |
ProductStorePaymentSetting |
paymentCustomMethodId |
Added |
No |
NA |
ProductStorePaymentSetting |
paymentGatewayConfigId |
Added |
No |
NA |
ProductStoreShipmentMeth |
shipmentCustomMethodId |
Added |
No |
NA |
ProductStoreShipmentMeth |
shipmentGatewayConfigId |
Added |
No |
NA |
ProductStoreShipmentMeth |
allowancePercent |
Added |
No |
NA |
ProductStoreShipmentMeth |
minimumPrice |
Added |
No |
NA |
ProductTypeAttribute |
attrDescription |
Added |
No |
NA |
QuoteAdjustment |
lastModifiedDate |
Added |
No |
NA |
QuoteAdjustment |
lastModifiedByUserLogin |
Added |
No |
NA |
QuoteAttribute |
attrDescription |
Added |
No |
NA |
QuoteItem |
leadTimeDays |
Added |
No |
NA |
QuoteRole |
fromDate |
Added |
Yes |
NA |
QuoteRole |
thruDate |
Added |
No |
NA |
QuoteTerm |
termDays |
Added |
No |
NA |
QuoteTerm |
textValue |
Added |
No |
NA |
QuoteTerm |
description |
Added |
No |
NA |
QuoteTermAttribute |
attrDescription |
Added |
No |
NA |
QuoteTypeAttr |
description |
Added |
No |
NA |
RequirementAttribute |
changeByUserLoginId |
Added |
No |
NA |
RequirementStatus |
changeByUserLoginId |
Added |
No |
NA |
ResponsibilityType |
parentTypeId |
Added |
No |
NA |
ResponsibilityType |
hasTable |
Added |
No |
NA |
ReturnAdjustment |
createdByUserLoginId |
Added |
No |
NA |
ReturnAdjustment |
lastModifiedDate |
Added |
No |
NA |
ReturnAdjustment |
lastModifiedByUserLogin |
Added |
No |
NA |
ReturnHeader |
supplierRmaId |
Added |
No |
NA |
ReturnItemResponse |
finAccountTransId |
Added |
No |
NA |
ReturnStatus |
changeByUserLoginId |
Added |
No |
NA |
SalaryStep |
fromDate |
Added |
Yes |
NA |
SalaryStep |
thruDate |
Added |
No |
NA |
SalaryStep |
createdByUserLoginId |
Added |
No |
NA |
SalaryStep |
lastModifiedByUserLogin |
Added |
No |
NA |
SalesOpportunity |
nextStepDate |
Added |
No |
NA |
ServiceSemaphore |
lockedByInstanceId |
Added |
No |
NA |
ShoppingListItem |
modifiedPrice |
Added |
No |
NA |
SkillType |
parentTypeId |
Added |
No |
NA |
SkillType |
hasTable |
Added |
No |
NA |
SupplierProduct |
shippingPrice |
Added |
No |
NA |
SupplierProduct |
supplierCommissionPerc |
Removed |
No |
NA |
TaxAuthorityRateProduct |
isTaxInShippingPrice |
Added |
No |
NA |
TerminationType |
parentTypeId |
Added |
No |
NA |
TerminationType |
hasTable |
Added |
No |
NA |
TestingNodeMember |
extendFromDate |
Added |
No |
NA |
TestingNodeMember |
extendThruDate |
Added |
No |
NA |
TimeEntry |
planHour |
Added |
No |
NA |
Timesheet |
approvedByUserLoginId |
Added |
No |
NA |
TrainingClassType |
parentTypeId |
Added |
No |
NA |
TrainingClassType |
hasTable |
Added |
No |
NA |
UnemploymentClaim |
thruDate |
Added |
No |
NA |
UserLogin |
externalAuthId |
Added |
No |
NA |
UserLogin |
userLdapDn |
Added |
No |
NA |
UserLogin |
disabledBy |
Added |
No |
NA |
ValueLinkKey |
createdByUserLogin |
Added |
No |
NA |
WebSite |
visualThemeSetId |
Added |
No |
NA |
WebSite |
hostedPathAlias |
Added |
No |
NA |
WebSite |
isDefault |
Added |
No |
NA |
WebSite |
displayMaintenancePage |
Added |
No |
NA |
WebSitePathAlias |
fromDate |
Added |
Yes |
R1738588 |
WebSitePathAlias |
thruDate |
Added |
No |
R1738588 |
WorkEffort |
tempExprId |
Added |
No |
NA |
WorkEffort |
sequenceNum |
Added |
No |
NA |
WorkEffortAttribute |
attrDescription |
Added |
No |
NA |
WorkEffortAssocAttribute |
attrDescription |
Added |
No |
NA |
WorkEffortAssocTypeAttr |
description |
Added |
No |
NA |
WorkEffortContactMech |
fromDate |
Added |
Yes |
NA |
WorkEffortContactMech |
thruDate |
Added |
No |
NA |
WorkEffortFixedAssetAssign |
availabilityStatusId |
Added |
No |
NA |
WorkEffortPartyAssignment |
assignedByUserLoginId |
Added |
No |
NA |
WorkEffortPurposeType |
parentTypeId |
Added |
No |
NA |
WorkEffortStatus |
reason |
Added |
No |
NA |
WorkEffortTypeAttr |
description |
Added |
No |
NA |
WorkOrderItemFulfillment |
shipGroupSeqId |
Added |
No |
NA |
5. Service Engine
A description of the service engine can be found at the OFBiz wiki Service Engine Guide
5.1. Declaration and Implementation
5.2. Supported languages
5.3. Transaction management
5.4. Web services
6. Widget System
6.1. Screen Widget
6.1.1. Decoration Pattern
6.2. Form Widget
6.3. Menu Widget
6.4. Tree Widget
6.5. Portal Widget
6.6. Platform Specific Code
6.7. Apache OFBiz Themes
The Apache OFBiz Project Release trunk
6.7.1. What is a theme
A Theme is an ofbiz component that defines all elements necessary to render all information generated by the screen engine through an embedded technology. Currently themes presents in Apache OFBiz use html5/jquery/css to do that.
To realize that, a theme can define some properties, among them some can be necessary. It can define its own ftl macro to render the different modelScreen elements and can define its own screen decorator to prepare the final user screen structure for the technology used by the theme.
6.7.2. How to define it
A theme is a standard component, present in the directory themes or plugins with a file definition present on widget/Theme.xml and support the widget-theme.xsd
To offer the possibility for end users to select the theme through the "Select Theme Screen", the theme need to load the entity VisualTheme and one or more entries related to this theme.
6.7.3. Structure of Theme.xml
The theme definition file help OFBiz to know what specific rendering the Theme want to use.
It’s composed by two definition elements and four optional blocks
Main definition
The First mandatory element is one or several visualThemeId related to the theme
Defined like that
    <visual-themes>
        <visual-theme id="MY_THEME"/>
    </visual-themes>
You need to define in the database an entry in VisualTheme Entity for each visual-theme id defined.
<entity-engine-xml>
    <VisualTheme visualThemeId="MY_THEME" visualThemeSetId="BACKOFFICE" description="My theme - Example (based on flatgrey)"/>
</entity-engine-xml>| a theme component can load one or more visual theme id. Usually only one is present. |
The second important (but not mandatory) element is implements
<extends location="component://common-theme/widget/Theme.xml"/>This element indicates that your theme copies from the extend theme all information not present in its file definition.
If this element isn’t present in your theme, you will need to define all information present in common-theme to be sure that OFBiz
misses nothing for a correct run. Otherwise some functionnalities can be broken…
| It’s highly recommended to extend the common-theme to be sure that your theme works correctly and to surcharge only what you need. |
The four following blocks are optionnal if you define an extends theme
General properties
This block contains all properties that the screen engine can use to prepare the rendering and that the theme can implement
    <widget-properties><!--Transversal properties relative to ofbiz widget component-->
        <default-view-size value="20"/>
        <autocompleter
                default-view-size="10"
                default-min-lenght="2"
                default-delay="300"
                display-return-field="true"/>
        <lookup
                position="topleft"
                width="640"
                height="500"/>
        <layered-modal
                width="800"
                height="600"/>
    </widget-properties>
Theme’s specific properties
This block contains all properties specific to this theme. In general these are some properties present on ftl template, that are initialized by the theme and can be surchaged by another theme through the extends elements.
        <property name="jgrowlPosition" value="center" type="String"/><!--possible value: top-left, top-right, bottom-left, bottom-right, center-->
        <property name="jgrowlWidth" value="800" type="Integer"/>
        <property name="jgrowlHeight" value="" type="Integer"/>
        <property name="jgrowlSpeed" value="100" type="Integer"/>
Ftl macro library
This block defines for each technology implemented by the screen engine where it can find the macro library for each model (Screen, Form, Tree, Menu)
   <templates><!-- Freemarker template use by this theme to render widget model-->
        <template name="screen" type="html" content-type="UTF-8" encoding="none" encoder="html" compress="false">
            <template-file widget="screen" location="component://common-theme/template/macro/HtmlScreenMacroLibrary.ftl"/>
            <template-file widget="form" location="component://common-theme/template/macro/HtmlFormMacroLibrary.ftl"/>
            <template-file widget="tree" location="component://common-theme/template/macro/HtmlTreeMacroLibrary.ftl"/>
            <template-file widget="menu" location="component://common-theme/template/macro/HtmlMenuMacroLibrary.ftl"/>
        </template>
        ...
   </templates>
If you want surcharge some macros, you can just create the desired macros and import the others from common-theme
(at the top of file) like that : |
Screen library
This block defines where OFBiz can find all official screens definitions in framework/common
Normally, you don’t need to change this file except if you need to define a default screen style that doesn’t exist OOTB. If you need to extend an existing one, you have to do it in the theme directory.
To define a new default screen style, you have to add it in this file, and point to the screen decorator in common-theme to define your default screen style as the default one.
     <common-screens><!--list all common screen and decorator global to each application that each theme can be surcharge or not and use the screen present on common theme-->
        <structural-decorator default-location="component://common-theme/widget/CommonScreens.xml">
            <screen name="GlobalDecorator"/>
            ...
        </structural-decorator>
        <embed-decorator default-location="component://common-theme/widget/CommonScreens.xml">
            <screen name="FindScreenDecorator"/>
        </embed-decorator>
        <general-screen default-location="component://common-theme/widget/CommonScreens.xml">
            <screen name="geoChart"/>
            ...
        </general-screen>
    </common-screens>
Screens are separated in three types :
-
structural-decorator : contains all decorators that organise the screens structures
-
embed-decorator : decorator used only on sub screens
-
general-screen : list all generic inter applications screens
6.7.4. The common-theme
This is the root theme that contains all information to ensure a good basic theme for OFBiz.
Currently it keeps all old themes system for backward compatibility with ftl template managed by the entity VisualThemeResource
6.7.5. Create your own theme
As a theme is a component, you can create a new theme like a plugin.
After creating a component, you can add the two minimal information :
-
Theme.xml file in plugins/my-theme/widget/ with minimal information :
<theme name="my-theme"
        xmlns:xsi="http://www.w3.org/2001/XMLSchema-instance"
        xsi:noNamespaceSchemaLocation="http://ofbiz.apache.org/dtds/widget-theme.xsd">
    <visual-themes>
        <visual-theme id="MY_THEME" display-name="My Theme"/>
    </visual-themes>
</theme>-
your data file to add your visual theme in plugins/my-theme/data/
<entity-engine-xml>
    <VisualTheme visualThemeId="MY_THEME" visualThemeSetId="BACKOFFICE"/>
</entity-engine-xml>
The presence of VisualTheme entity helps to indicate which theme is available in your instance, specially helpful for tenant installations.
To display your theme in OFBiz theme library, you can complete the information on each visual theme like
<theme name="my-theme"
        xmlns:xsi="http://www.w3.org/2001/XMLSchema-instance"
        xsi:noNamespaceSchemaLocation="http://ofbiz.apache.org/dtds/widget-theme.xsd">
    <visual-themes>
        <visual-theme id="MY_THEME" display-name="My Theme">
            <description>My new funny theme under nice tecnno</description>
            <screenshot location="/mytheme/screenshot1.png"/>
            <screenshot location="/mytheme/screenshot2.png"/>
        </visual-theme>
    </visual-themes>
</theme>| display-name and description support the flexibleStringExpander syntax |
extends common-theme
This is a first step to understand how the theme system works. With your new theme, you can try to surchage different elements.
To start, extends the common-theme :
<theme name="my-theme"
        xmlns:xsi="http://www.w3.org/2001/XMLSchema-instance"
        xsi:noNamespaceSchemaLocation="http://ofbiz.apache.org/dtds/widget-theme.xsd">
    <visual-themes>
        <visual-theme id="MY_THEME" display-name="My Theme">
            <description>My new funny theme under nice tecnno</description>
            <screenshot location="/mytheme/screenshot1.png"/>
        </visual-theme>
    </visual-themes>
    <extends location="component://common-theme/widget/Theme.xml"/>
</theme>
Now your theme should be operational, but without particularity.
You can surcharge a ftl macro, to do this create your own ftl macro file in plugins/my-theme/templates/macro/HtmlFormMacroLibrary.ftl with
<#include "component://common-theme/template/macro/HtmlFormMacroLibrary.ftl"/>
<#macro renderDisplayField type imageLocation idName description title class alert inPlaceEditorUrl="" inPlaceEditorParams="">
<#if description?has_content>
*###*${description?replace("\n", "<br />")}**<#t/>
<#else>
*# #*<#t/>
</#if>
</#macro>Now indicate to your theme that you want use this library
<theme name="my-theme"
        xmlns:xsi="http://www.w3.org/2001/XMLSchema-instance"
        xsi:noNamespaceSchemaLocation="http://ofbiz.apache.org/dtds/widget-theme.xsd">
    <visual-themes>
        <visual-theme id="MY_THEME" display-name="My Theme">
            <description>My new funny theme under nice tecnno</description>
            <screenshot location="/mytheme/screenshot1.png"/>
        </visual-theme>
    </visual-themes>
    <extends location="component://common-theme/widget/Theme.xml"/>
    <templates>
        <template name="screen" type="html" content-type="UTF-8" encoding="none" encoder="html" compress="false">
            <template-file widget="form" location="component://my-theme/template/macro/HtmlFormMacroLibrary.ftl"/>
        </template>
    </templates>
</theme>
and check the result when you select your theme. The result isn’t really interesting but it’s to understand how it works.
create from scratch
TODO…
6.7.6. Backware compatibility with OFBiz 16.11 and above
How themes worked before
Before the theme management by model definition, all configurations have been present in the database through entity
VisualTheme and VisualThemeRessource.
These ressources were loaded in a layoutProperties variable and used directly by decorator screens and ftl templates.
Now with the common-theme
All this logic is still present in the common-theme template to keep backward compatibility, but the VisualThemeRessource is now useless and properties have been migrated to the Theme definition in the part theme-properties
Example with BlueLight
The blue light theme has been these properties in VisualThemeRessource :
    <VisualTheme visualThemeId="BLUELIGHT" visualThemeSetId="BACKOFFICE" description="BlueLight Theme: breadcrumbs, drop-down menus and rounded corners"/>
    <VisualThemeResource visualThemeId="BLUELIGHT" resourceTypeEnumId="VT_NAME" resourceValue="BLUELIGHT" sequenceId="01"/>
    <VisualThemeResource visualThemeId="BLUELIGHT" resourceTypeEnumId="VT_HDR_IMAGE_URL" resourceValue="/images/ofbiz_logo.png" sequenceId="01"/>
    <VisualThemeResource visualThemeId="BLUELIGHT" resourceTypeEnumId="VT_SHORTCUT_ICON" resourceValue="/images/ofbiz.ico" sequenceId="01"/>
    <VisualThemeResource visualThemeId="BLUELIGHT" resourceTypeEnumId="VT_SCREENSHOT" resourceValue="/bluelight/screenshot.jpg" sequenceId="01"/>

    <!-- CSS references -->
    <VisualThemeResource visualThemeId="BLUELIGHT" resourceTypeEnumId="VT_STYLESHEET" resourceValue="/bluelight/style.css" sequenceId="01"/>
    <VisualThemeResource visualThemeId="BLUELIGHT" resourceTypeEnumId="VT_HELPSTYLESHEET" resourceValue="/bluelight/help.css" sequenceId="01"/>
    <VisualThemeResource visualThemeId="BLUELIGHT" resourceTypeEnumId="VT_DOCBOOKSTYLESHEET" resourceValue="/bluelight/webapp/bluelight/docbook.css" sequenceId="01"/>
    <VisualThemeResource visualThemeId="BLUELIGHT" resourceTypeEnumId="VT_STYLESHEET" resourceValue="/common/js/jquery/plugins/asmselect/jquery.asmselect-1.0.4a-beta.css" sequenceId="02"/>

    <!-- Javascript references -->
    <VisualThemeResource visualThemeId="BLUELIGHT" resourceTypeEnumId="VT_HDR_JAVASCRIPT" resourceValue="/common/js/jquery/jquery-1.11.0.min.js" sequenceId="01"/>
    <VisualThemeResource visualThemeId="BLUELIGHT" resourceTypeEnumId="VT_HDR_JAVASCRIPT" resourceValue="/common/js/jquery/jquery-migrate-1.2.1.js" sequenceId="02"/>
    <VisualThemeResource visualThemeId="BLUELIGHT" resourceTypeEnumId="VT_HDR_JAVASCRIPT" resourceValue="/common/js/jquery/ui/js/jquery-ui-1.10.3.min.js" sequenceId="03"/>
    <VisualThemeResource visualThemeId="BLUELIGHT" resourceTypeEnumId="VT_HDR_JAVASCRIPT" resourceValue="/common/js/jquery/plugins/asmselect/jquery.asmselect-1.0.4a-beta.js" sequenceId="05"/>
    <VisualThemeResource visualThemeId="BLUELIGHT" resourceTypeEnumId="VT_HDR_JAVASCRIPT" resourceValue="/common/js/jquery/plugins/datetimepicker/jquery-ui-timepicker-addon.min-1.4.3.js" sequenceId="07"/>
    <VisualThemeResource visualThemeId="BLUELIGHT" resourceTypeEnumId="VT_HDR_JAVASCRIPT" resourceValue="/common/js/jquery/plugins/mask/jquery.mask-1.14.13.min.js" sequenceId="10"/>
    <VisualThemeResource visualThemeId="BLUELIGHT" resourceTypeEnumId="VT_HDR_JAVASCRIPT" resourceValue="/common/js/jquery/plugins/validate/jquery.validate.min.js" sequenceId="12"/>
    <VisualThemeResource visualThemeId="BLUELIGHT" resourceTypeEnumId="VT_HDR_JAVASCRIPT" resourceValue="/common/js/util/OfbizUtil.js" sequenceId="15"/>
    <VisualThemeResource visualThemeId="BLUELIGHT" resourceTypeEnumId="VT_HDR_JAVASCRIPT" resourceValue="/common/js/util/fieldlookup.js" sequenceId="16"/>
    <VisualThemeResource visualThemeId="BLUELIGHT" resourceTypeEnumId="VT_HDR_JAVASCRIPT" resourceValue="/common/js/plugins/date/date.timezone-min.js" sequenceId="18"/>
    <VisualThemeResource visualThemeId="BLUELIGHT" resourceTypeEnumId="VT_HDR_JAVASCRIPT" resourceValue="/common/js/util/miscAjaxFunctions.js" sequenceId="19"/>
    <VisualThemeResource visualThemeId="BLUELIGHT" resourceTypeEnumId="VT_HDR_JAVASCRIPT" resourceValue="/common/js/util/selectMultipleRelatedValues.js" sequenceId="20"/>
    <VisualThemeResource visualThemeId="BLUELIGHT" resourceTypeEnumId="VT_HDR_JAVASCRIPT" resourceValue="/common/js/util/util.js" sequenceId="21"/>
    <VisualThemeResource visualThemeId="BLUELIGHT" resourceTypeEnumId="VT_HDR_JAVASCRIPT" resourceValue="/common/js/plugins/date/FromThruDateCheck.js" sequenceId="22"/>
    <VisualThemeResource visualThemeId="BLUELIGHT" resourceTypeEnumId="VT_HDR_JAVASCRIPT" resourceValue="/bluelight/dropdown.js" sequenceId="30"/>

    <!-- ftl references -->
    <VisualThemeResource visualThemeId="BLUELIGHT" resourceTypeEnumId="VT_HDR_TMPLT_LOC" resourceValue="component://bluelight/template/Header.ftl" sequenceId="01"/>
    <VisualThemeResource visualThemeId="BLUELIGHT" resourceTypeEnumId="VT_FTR_TMPLT_LOC" resourceValue="component://bluelight/template/Footer.ftl" sequenceId="01"/>
    <VisualThemeResource visualThemeId="BLUELIGHT" resourceTypeEnumId="VT_NAV_OPEN_TMPLT" resourceValue="component://bluelight/template/AppBarOpen.ftl" sequenceId="01"/>
    <VisualThemeResource visualThemeId="BLUELIGHT" resourceTypeEnumId="VT_NAV_CLOSE_TMPLT" resourceValue="component://bluelight/template/AppBarClose.ftl" sequenceId="01"/>
    <VisualThemeResource visualThemeId="BLUELIGHT" resourceTypeEnumId="VT_MSG_TMPLT_LOC" resourceValue="component://bluelight/template/Messages.ftl" sequenceId="01"/>
Now it’s just
<VisualTheme visualThemeId="BLUELIGHT" visualThemeSetId="BACKOFFICE"/>And on theme definition
    <theme-properties>
        <!--javascript lib-->
        <property name="VT_HDR_JAVASCRIPT['add']" value="/bluelight/dropdown.js" sequenceId="30"/>
        <!--Css style-->
        <property name="VT_STYLESHEET['add']" value="/bluelight/style.css"/>
        <property name="VT_HELPSTYLESHEET['add']" value="/bluelight/help.css"/>
        <property name="VT_DOCBOOKSTYLESHEET['add']" value="/bluelight/webapp/bluelight/docbook.css"/>
        <!--template location-->
        <property name="VT_HDR_TMPLT_LOC" value="component://bluelight/template/Header.ftl"/>
        <property name="VT_FTR_TMPLT_LOC" value="component://bluelight/template/Footer.ftl"/>
        <property name="VT_NAV_OPEN_TMPLT" value="component://bluelight/template/AppBarOpen.ftl"/>
        <property name="VT_NAV_CLOSE_TMPLT" value="component://bluelight/template/AppBarClose.ftl"/>
        <property name="VT_MSG_TMPLT_LOC" value="component://bluelight/template/Messages.ftl"/>
    </theme-properties>
Values with /images/… have been moved to the common-theme that bluelight extends, the theme definition keeps only what the theme adds to the extended theme.
| property name supports the FlexibleMapAccessor syntax, so you can continue to populate a list (VT_STYLESHEET['add']), reset a list (VT_STYLESHEET[]) or add an element on the top list (VT_STYLESHEET[+0]) because some time the order libraries loading is important |
Migrate you own theme
Easily, create you Theme.xml and move your VisualThemeResource in theme-properties like in the BlueLight example above.
Maybe you will need to update your template because the modelTheme return ressources not always as list. So :
<property name="VT_HDR_TMPLT_LOC" value="component://bluelight/template/Header.ftl"/> → return a String
with component://bluelight/template/Header.ftl
<property name="VT_STYLESHEET['add'] value="…" → return a List<String>
7. Core APIs
8. Development environment
8.1. Setup your environment
8.1.1. Java SE
8.1.2. IDE
Eclipse
Intellij Idea
8.1.3. Database
8.2. Web tools
The Webtools application is the UI-gateway to all the framework functions.
8.2.1. Help for Webtools Main page.
This is the default screen for the Webtools application.
Several links are present on this page to access specific tool screens directly.
Using the application menu you can select the tool you need.
-
The Logging section is used to view and configure the OFBiz system logs.
-
The Cache & Debug section is used to monitor the OFBiz cache system status. You can even set or clear some cache content or force Garbage collection with this tool.
-
The Artifact Info section is used to navigate through all OFBiz artifact files. When accessing this section the complete OFBiz code base is scanned and a list of all artifacts is offered to the user to be navigated. Please note that the initial scan can take a while to be completed.
-
The Entity Engine section is used to interact with the entities defined in the system. You can view the entity structures, search for entity content, navigate though related entities, etc.
-
The Service Engine section is used to interact with the services defined in the system. You can view all services details, monitor the jobs that are running, the active threads. You can even manually run a service or schedule a periodic/delaied job execution.
-
The Import/Export section is used to transfer entity content from the OFBiz system to external systems and viceversa. Various import/export systems and formats are available.
-
The Configuration section is used to set parameters for the OFBiz system.
9. From Mini Language to Groovy
This is a small guide for everybody involved in converting the Mini Language into Groovy.
|
Why is this important? This tutorial is directly linked to the efforts of converting all scripts in Mini Language to newer Groovy Scripts. All of this is done, because Groovy is much more readable and easier to review, more up to date and many other reasons, which can be found here: Proposal for deprecating Mini Language To contribute, or just be up to date with the current process, you can look at the existing JIRA issue OFBIZ-9350 - Deprecate Mini Lang |
| For memory, a description of the Mini Language guide can be found at the OFBiz wiki - Mini Language Reference |
9.1. Groovy DSL (dynamic scripting library)
9.1.1. How to get Groovy support in your IDE
The following paragraph is for Eclipse users.
It is possible to get Groovy support in Eclipse by converting the loaded project to a Groovy Project. The project itself will work as before.
To do this just follow these few steps:
-
Right-click on the project that has to be converted
-
Click on "Configure"
-
Click on "Convert to Groovy Project"
Eclipse will automatically load the file OfbizDslDescriptorForEclipse.dsld , in which the known fields and methods used in Groovy Scripts are defined.
9.1.2. Known Fields
property name: 'parameters'

type : 'java.util.Map'
These are the parameters given to the Groovy Script, when it is called as a service. It is equivalent to Map<String, Object> context in the Java-Service-Definition.
property name: 'context'

type: 'java.util.Map'
More parameters, which are, for example, given through a screen or another Groovy Script. This is important when the script is called through an action segment of a screen.
property name: 'delegator'

type: 'org.apache.ofbiz.entity.Delegator'
Normal instance of the Delegator, which is used for special database access.
property name: 'dispatcher'

type: 'org.apache.ofbiz.service.LocalDispatcher'
Normal instance of the LocalDispatcher, which is used to call services and other service-like operations.
property name: 'security'

type: 'org.apache.ofbiz.security.Security'
Normal instance of the Security-Interface with which permission checks are done.
9.1.3. Known Methods
method name: 'runService'

type: 'java.util.Map'

params: [serviceName: 'String', inputMap: 'java.util.Map']
Helping method to call services instead of dispatcher.runSync(serviceName, inputMap). Also possible: run service: serviceName, with: inputMap
method name: 'makeValue'

type: 'java.util.Map'

params: [entityName: 'String']
Helping method to make a GenericValue instead of delegator.makeValue(entityName). Creates an empty GenericValue of the specific entity.
method name: 'findOne'

type: 'java.util.Map'

params: [entityName: 'String', inputMap: 'java.util.Map']
Helping method to find one GenericValue in the database. Used instead of delegator.findOne(entityName, inputMap)
method name: 'findList'

type: 'java.util.List'

params: [entityName: 'String', inputMap: 'java.util.Map']
Helping method to find many GenericValue in the database. Used instead of delegator.findList(entityName, inputMap, null, null, null, false)
method name: 'select'

type: 'org.apache.ofbiz.entity.util.EntityQuery'

params: [entity: 'java.util.Set']
Helping method used instead of EntityQuery.use(delegator).select(…)
method name: 'select', type: 'org.apache.ofbiz.entity.util.EntityQuery', params: [entity: 'String…']
As above.
method name: 'from'

type: 'org.apache.ofbiz.entity.util.EntityQuery'

params: [entity: 'java.lang.Object']
Helping method used instead of EntityQuery.use(delegator).from(…)
method name: 'success'

type: 'def'

params: [message: 'String']
Helping method used instead of ServiceUtil.returnSuccess(message)
method name: 'failure'

type: 'java.util.Map'

params: [message: 'String']
Helping method used instead of ServiceUtil.returnFailure(message)
method name: 'error'

type: 'def'

params: [message: 'String']
Helping method used instead of ServiceUtil.returnError(message)
method name: 'logInfo'

type: 'void'

params: [message: 'String']
Helping method used instead of Debug.logInfo(message, fileName)
method name: 'logWarning'

type: 'void'

params: [message: 'String']
Helping method used instead of Debug.logWarning(message, fileName)
method name: 'logError'

type: 'void'

params: [message: 'String']
Helping method used instead of Debug.logError(message, fileName)
method name: 'logVerbose'

type: 'void'

params: [message: 'String']
Helping method used instead of Debug.logVerbose(message, fileName)
The actual definition of the methods can be found in `/framework/service/src/main/java/org/apache/ofbiz/service/engine/GroovyBaseScript.groovy,
the variables dctx, dispatcher and delegator are set in the file GroovyEngine.java which can be found in the same location.
9.2. Services
9.2.1. From MiniLang to Groovy
To see additional examples and finished conversions, which may help with occurring questions, click: OFBIZ-9350 - Deprecate Mini Lang There is a chance that a similar case has already been converted.
| When a simple-method ends, it will automatically at least return a success-map. |
All the Groovy Services have to return success at least, too.
return success()9.2.2. Getting started
MiniLang files consist of services, which, in most cases, implement services.
The get converted to Groovy like the following:
<!-- This is MiniLang -->
<simple-method method-name="createProductCategory" short-description="Create an ProductCategory">
   <!-- Code -->
</simple-method>
// This is the converted Groovy equivalent
/**
* Create an ProductCategory
*/
def createProductCategory() {
// Code
}It will be useful for future developers, and everybody who has to check something in the code, to put at least the short-description as the new Groovydoc. This will hopefully more or less explain, what the method should or shouldn’t do. If the short-description isn’t helpful enough, feel free complete it.
The structure of if and else in MiniLang is a little different than the one from Groovy or Java and can be a bit confusing when first seen, so here is an example:
<if-empty field="parameters.productCategoryId">
    <sequenced-id sequence-name="ProductCategory" field="newEntity.productCategoryId"/>
<else>
    <set field="newEntity.productCategoryId" from-field="parameters.productCategoryId"/>
    <check-id field="newEntity.productCategoryId"/>
    <check-errors/>
</else>
</if-empty>| Notice, that the else always starts before the if-tag is closed, but sometimes isn’t indented as one would expect it. |
When navigating through bigger if-phrases, the navigation itself will be much easier through just clicking in the opening or closing if-tag; Eclipse will automatically mark the matching opening or closing if-tag for you.
There are two possibilities to initialize a field/variable in Groovy.
-
To define a field/variable with its correct typing
String fieldName = "value"` -
To just "define" a field/variable. The IDE you are working with may not recognize the typing, but OFBiz can work with it:
def fieldName = "value"
9.3. Checking Fields
| Minilang | Groovy |
|---|---|
|
|
|
|
|
|
|
|
|
|
9.4. Setting Fields
| Minilang | Groovy |
|---|---|
|
|
|
|
|
|
|
|
|
|
9.5. Starting Services
| Minilang | Groovy |
|---|---|
|
|
|
|
9.6. Preparing Service Results
| Minilang | Groovy |
|---|---|
|
|
9.7. Database Communication
| Minilang | Groovy |
|---|---|
|
|
|
|
|
|
|
|
|
|
|
|
|
|
|
|
|
|
|
|
|
|
|
|
|
|
|
|
9.8. Permissions
To also check for admin-permissions, this method has to be used:hasEntityPermission(permission, action, userLogin)
|
If the method is used with wildcards, it is important to not forget the underscore, which comes before the parameter action!
| Minilang | Groovy |
|---|---|
|
|
|
|
9.9. Timestamp And System Time
The first two simple-method are deprecated; the third method should have been used instead.
| Minilang | Groovy |
|---|---|
|
|
|
|
|
|
|
|
9.10. Logging
Since all of the log methods are know to the Groovy Language, it is possible to just nearly use them as they are in MiniLang.
For further explanation, here are some examples:
| Minilang | Groovy |
|---|---|
|
|
|
|
9.11. General
| Minilang | Groovy |
|---|---|
|
|
|
|
|
|
|
|
|
|
|
|
9.12. Where to find MiniLang implementation
If you find yourself in a position, where you don’t know how to convert a certain tag from MiniLang to Groovy, you can always check the Java implementation of the MiniLang method.
All of the methods have an existing Java implementation and you can find all of them in this folder: /ofbiz/trunk/framework/minilang/src/main/java/org/apache/ofbiz/minilang/method
The interesting part of this implementation is the method exec(), which actually runs the MiniLang tag.
The tag <remove-by-and> for example is realized using this part of code here:
@Override

public boolean exec(MethodContext methodContext) throws MiniLangException {
    @Deprecated
    String entityName = entityNameFse.expandString(methodContext.getEnvMap());
    if (entityName.isEmpty()) {
        throw new MiniLangRuntimeException("Entity name not found.", this);
    }
    try {
        Delegator delegator = getDelegator(methodContext);
        delegator.removeByAnd(entityName, mapFma.get(methodContext.getEnvMap()));
    } catch (GenericEntityException e) {
        String errMsg = "Exception thrown while removing entities: " + e.getMessage();
        Debug.logWarning(e, errMsg, module);
        simpleMethod.addErrorMessage(methodContext, errMsg);
        return false;
    }
    return true;
}
In this you can find one important part of code, which is:
delegator.removeByAnd(entityName, mapFma.get(methodContext.getEnvMap()));This tells you, that, if you’re trying to convert the tag <remove-by-and>, you can use delegator.removeByAnd() in Groovy.
10. Testing
10.1. Unit Test (Using JUnit)
10.1.1. How to define a unit test?
-
Define test-suite in ofbiz-component.xml like this:
<test-suite loader="main" location="testdef/servicetests.xml"/> -
Create test-case in test-suite file.
    <test-suite suite-name="servicetests"
        xmlns:xsi="http://www.w3.org/2001/XMLSchema-instance"
        xsi:noNamespaceSchemaLocation="http://ofbiz.apache.org/dtds/test-suite.xsd">
        ....
        ....
        <test-case case-name="test-case-name">
        ...
        </test-case>
        ....
        ....
    </test-suite>
10.1.2. How to create a test case?
Define a test-case in an XML test-suite file like this:
    <test-case case-name="test-case-name">
        ...
    </test-case>
The test-case tag contains details of each test type:
Entity XML
Specific entity xml and its action would like to be tested in entity-xml-url attribute and action attribute respectively like this:
    <test-case case-name="service-dead-lock-retry-assert-data">
        <entity-xml action="assert" entity-xml-url="component://service/testdef/data/ServiceDeadLockRetryAssertData.xml"/>
    </test-case>
JUnit
Specific class’s name which will be tested, in a class-name attribute like this:
    <test-case case-name="service-tests">
        <junit-test-suite class-name="org.apache.ofbiz.service.test.ServiceEngineTests"/>
    </test-case>
Service
Specific service’s name which will be tested in a service-name attribute like this:
    <test-case case-name="service-lock-wait-timeout-retry-test">
        <service-test service-name="testServiceLockWaitTimeoutRetry"/>
    </test-case>
Simple Method
Specific simple method’s location and name which will be tested in a location and a name attribute respectively like this:
    <test-case case-name="auto-accounting-transaction-tests-PoReceipt">
        <simple-method-test location="component://accounting/minilang/test/AutoAcctgTransTests.xml" name="testAcctgTransOnPoReceipts"/>
    </test-case>
10.1.3. How to run a unit test?
You can run unit test by run 'gradle' with following target:
Execute all unit tests (no need access to the DB)
gradlew test
Execute all integration tests (need access to the DB)
gradlew testIntegration
OR
gradlew 'ofbiz --test'
Execute integration tests with a different log level
It is possible to start integration tests with a log level different from the default one. The log levels allowed are listed below from most verbose to least verbose:
-
always
-
verbose
-
timing
-
info
-
important
-
warning
-
error
-
fatal
gradlew "ofbiz --test loglevel=fatal"
Execute an integration test case
Run a test case, in this example the component is "entity" and the case name is "entity-tests"
gradlew "ofbiz --test component=entity --test suitename=entitytests --test case=entity-query-tests"
Execute an integration test case in debug mode with verbose log
Listens on port 5005
gradlew "ofbiz --test component=entity --test loglevel=verbose" --debug-jvm
Execute an integration test suite
gradlew "ofbiz --test component=entity --test suitename=entitytests"
Execute an integration test suite in debug mode
Listens on port 5005
gradlew "ofbiz --test component=entity --test suitename=entitytests" --debug-jvm
Execute all component tests
gradlew "ofbiz --test component=entity"
Execute all component tests in debug mode
Listens on port 5005
gradlew "ofbiz --test component=entity" --debug-jvm
10.1.4. Possible error messages
Some error messages in the log are not important and often caused by the test.
Roll back
Roll back error message occurred when transaction roll back data. This error message will be in between starting and finished test cass line like this:
    [java] 2009-12-22 16:05:28,349 (main) [   TestRunContainer.java:238:INFO ] [JUNIT] : [test case's name] starting...
    [java] 2009-12-22 16:05:28,355 (main) [    TransactionUtil.java:336:ERROR]
    ....
    ....
    ....
    [java] ---- exception report ----------------------------------------------------------
    [java] [TransactionUtil.rollback]
    [java] Exception: java.lang.Exception
    [java] Message: Stack Trace
    [java] ---- stack trace ---------------------------------------------------------------
    [java] java.lang.Exception: Stack Trace
    [java] org.apache.ofbiz.entity.transaction.TransactionUtil.rollback(TransactionUtil.java:335)
    [java] org.apache.ofbiz.entity.transaction.TransactionUtil.rollback(TransactionUtil.java:317)
    [java] org.apache.ofbiz.entity.test.EntityTestSuite.testTransactionUtilRollback(EntityTestSuite.java:437)
    [java] sun.reflect.NativeMethodAccessorImpl.invoke0(Native Method)
    [java] sun.reflect.NativeMethodAccessorImpl.invoke(NativeMethodAccessorImpl.java:39)
    [java] sun.reflect.DelegatingMethodAccessorImpl.invoke(DelegatingMethodAccessorImpl.java:25)
    [java] java.lang.reflect.Method.invoke(Method.java:597)
    [java] junit.framework.TestCase.runTest(TestCase.java:154)
    [java] junit.framework.TestCase.runBare(TestCase.java:127)
    [java] junit.framework.TestResult$1.protect(TestResult.java:106)
    [java] junit.framework.TestResult.runProtected(TestResult.java:124)
    [java] junit.framework.TestResult.run(TestResult.java:109)
    [java] junit.framework.TestCase.run(TestCase.java:118)
    [java] junit.framework.TestSuite.runTest(TestSuite.java:208)
    [java] junit.framework.TestSuite.run(TestSuite.java:203)
    [java] junit.framework.TestSuite.runTest(TestSuite.java:208)
    [java] junit.framework.TestSuite.run(TestSuite.java:203)
    [java] org.apache.ofbiz.testtools.TestRunContainer.start(TestRunContainer.java:146)
    [java] org.apache.ofbiz.base.container.ContainerLoader.start(ContainerLoader.java:100)
    [java] org.apache.ofbiz.base.start.Start.startStartLoaders(Start.java:272)
    [java] org.apache.ofbiz.base.start.Start.startServer(Start.java:322)
    [java] org.apache.ofbiz.base.start.Start.start(Start.java:326)
    [java] org.apache.ofbiz.base.start.Start.main(Start.java:411)
    [java] --------------------------------------------------------------------------------
    [java]
    ....
    ....
    ....
    [java] 2009-12-22 16:05:28,366 (main) [    TransactionUtil.java:346:INFO ] [TransactionUtil.rollback] transaction rolled back
    [java] 2009-12-22 16:05:28,370 (main) [   TestRunContainer.java:234:INFO ] [JUNIT] : [test case's name] finished.
10.1.5. Test result
After you run unit test, you can see the result of the testing.
If you use run-tests target, you can see test result web page by view runtime/logs/test-results/html/index.html
file in web browser and see JUnit Test Result files for each test suite in runtime/logs/test-results directory.
If you use other target you only see JUnit Test Result file in runtime/logs/test-results.
10.2. Integration Tests
11. Deployment
For a core configuration guide check the OFBiz configuration Guide (some points are not up to date).
11.1. email
11.1.1. HowTo use email in OFBiz
Receiving Email.
OFBiz can receive email for multiple email addresses and via an MCA can create Communication events for the involved parties
of the email.
Email attachments, via again the MCA are stored in the content component and can be accessed via the content Id.
Examples of an MCA can be found in the Party and Content Component.
To receive email a single POP/IMAP mailbox is polled at regular intervals.
This is configured in the ${ofbiz install dir}/framework/service/ofbiz-component.xml file in the commented section
JavaMail Listener Container.
Any email address you want to be handled by OFBiz need to be forwarded to this single mailbox by an external mail server.
OFBiz then will try to match the email addresses to existing parties and will create a single communication event referring
to the found parties.
If an incoming email address cannot be matched against a party, the communication event will get a special status and the receiving party can either delete the communication event or can ask the system to automatically create a party from the incoming email address.
By default the configuaration file has the email poller commented out.
The parameters to this function are pretty self explanatory.
Sending Email in OFBiz
Various parts in the OFBiz application are sending out email for various reasons.
Sending out email is controlled in the ${ofbiz install dir}/framework/common/config/general.properties file with the following parameters:
-
SMTP Server (relay host): mail.smtp.relay.host
-
SMTP Username (if needed): mail.smtp.auth.user
-
SMTP Password (if needed): mail.smtp.auth.password
-
Turn on email notifications by setting the mail.notifications.enabled property to "Y".
12. Security
12.1. OFBiz in production
In matter of security, to be sure to be up to date, the first place to look at is https://ofbiz.apache.org/security.html
For more details you may be also interested by https://issues.apache.org/jira/browse/OFBIZ-1525
If you look for how to handle access permissions, this page should help you: https://cwiki.apache.org/confluence/display/OFBIZ/OFBiz+Security+Permissions
Last but not least, you will certainly find useful, the security section of The Apache OFBiz Technical Production Setup Guide
12.1.1. Gradle Update
OFBiz uses Gradle for many things, including building and running OFBiz.
Out Of The Box (OOTB) you get versions of third parties libraries which might need to be updated from time to time. For that you may take as an example to follow https://issues.apache.org/jira/browse/OFBIZ-10213
12.2. Passwords and JWT (JSON Web Tokens) usage
12.2.1. How are set and used passwords and JWT in Apache OFBiz
The Apache OFBiz Project Release trunk
Passwords
Demo and seed passwords are stored in files loaded through security ofbiz-component.xml. To know more about that be sure to read:
-
The technical production setup guide notably "Initial Data Loading" and "Security Settings" sections
| These configuration steps are not to be neglected for the security of a production environment |
JWT usage
JSON Web Token (JWT) is an Internet standard for creating JSON-based access tokens that assert some number of claims.
We currently use JWT in 2 places:
-
To let users safely recreate passwords (in backend and frontend)
-
To allow SSO (Single Sign-on) jumpings from an OFBiz instance to another on another domain, by also using CORS ( Cross-origin resource sharing) on the target server
How to secure JWT
When you use JWT, in order to sign your tokens, you have the choice of using a sole so called secret key or a pair of public/private keys: https://jwt.io/introduction/.
You might prefer to use pair of public/private keys, for now by default OFBiz uses a simple secret key. Remains the way how to store this secret key. This is an interesting introduction about this question.
-
The first idea which comes to mind is to use a property in the security.properties file. It’s safe as long as your file system is not compromised.
-
You may also pick a SystemProperty entity (overrides the file property). It’s safe as long as your DB is not compromised.
-
We recommend to not use an environment variable as those can be considered weak:
-
You may want to tie the encryption key to the logged in user. This is used by the password recreation feature. The JWT secret key is salted with a combination of the current logged in user and her/his password. This is a simple and effective safe way.
-
Use a JTI (JWT ID). A JTI prevents a JWT from being replayed. This auth0 blog article get deeper in that. The same is kinda achieved with the password recreation feature. When the user log in after the new password creation, the password has already been changed. So the link (in the sent email) containing the JWT for the creation of the new password can’t be reused.
-
Tie the encryption key to the hardware. You can refer to this Wikipedia page for more information.
-
If you want to get deeper in this get to this OWASP documentation
Note: if you want to use a pair of public/private keys you might want to consider leveraging the Java Key Store that is also used by the "catalina" component to store certificates. Then don’t miss to read:
Also remember that like everything a JWT can be attacked and, though not used or tried in OFBiz yet, a good way is to mitigate an attack by using a KeyProvider. I have created OFBIZ-11187 for that.
The security.properties file contains five related properties:
# -- If false, then no externalLoginKey parameters will be added to cross-webapp urls
security.login.externalLoginKey.enabled=true
# -- Security key used to encrypt and decrypt the autogenerated password in forgot password functionality.
#    Read Passwords and JWT (JSON Web Tokens) usage documentation to choose the way you want to store this key
login.secret_key_string=p2s5u8x/A?D(G+KbPeShVmYq3t6w9z$B&E)H@McQfTjWnZr4u7x!A%D*F-JaNdRg
# -- Time To Live of the token send to the external server in seconds
security.jwt.token.expireTime=1800
# -- Enables the internal Single Sign On feature which allows a token based login between OFBiz instances
# -- To make this work you also have to configure a secret key with security.token.key
security.internal.sso.enabled=false
# -- The secret key for the JWT token signature. Read Passwords and JWT (JSON Web Tokens) usage documentation to choose the way you want to store this key
security.token.key=D*G-JaNdRgUkXp2s5v8y/B?E(H+MbPeShVmYq3t6w9z$C&F)J@NcRfTjWnZr4u7
There are also SSO related SystemProperties in SSOJWTDemoData.xml:
    <SystemProperty systemResourceId="security" systemPropertyId="security.internal.sso.enabled" systemPropertyValue="false"/>
    <SystemProperty systemResourceId="security" systemPropertyId="SameSiteCookieAttribute" systemPropertyValue="strict"/>
Internal SSO
The introduction of the same-site attribute set to 'strict' for all cookies prevents the internal Single Sign On feature. Why is clearly explained here.
So same-site attribute set to 'none' is necessary for the internal SSO to work, 'lax' is not enough. So if someone wants to use the internal SSO feature s/he also needs to use the CSRF token defense. If s/he wants to be safe from CSRF attacks. Unfortunately, due backporting difficulties, this option is currently (2020-04-15) only available in trunk.
An alternative would be to use the Fetch Javascript API with the
credentials: "include"option to enable CORS. Here is an example
For those interested, there are more information in https://issues.apache.org/jira/browse/OFBIZ-11594
Last but not least
Be sure to read Keeping OFBiz secure
12.3. CSRF defense
12.3.1. How is done the CSRF defense in Apache OFBiz and how to adapt it if needed
The Apache OFBiz Project Release trunk
The same-Site attribute
The SameSite attribute is an effective counter measure to cross-site request forgery, cross-site script inclusion, and timing attacks.
By default OOTB the SameSiteFilter property sets the same-site attribute value to 'strict. SameSiteFilter allows to change to 'lax' if needed. If you use 'lax' we recommend that you set the csrf.defense.strategy property to org.apache.ofbiz.security.CsrfDefenseStrategy in order to provide an effective defense against CSRF attacks.
Properties
The security.properties file contains related properties:
# -- By default the SameSite value in SameSiteFilter is 'strict'.
# -- This property allows to change to 'lax' if needed.
# -- If you use 'lax' we recommend that you set
# -- org.apache.ofbiz.security.CsrfDefenseStrategy
# -- for csrf.defense.strategy (see below)
SameSiteCookieAttribute=
# -- The cache size for the Tokens Maps that stores the CSRF tokens.
# -- RemoveEldestEntry is used when it's get above csrf.cache.size
# -- Default is 5000
# -- TODO: possibly separate tokenMap size from partyTokenMap size
csrf.cache.size=
# -- Parameter name for CSRF token. Default is "csrf" if not specified
csrf.tokenName.nonAjax=
# -- The csrf.entity.request.limit is used to show how to avoid cluttering the Tokens Maps cache with URIs starting with "entity/"
# -- It can be useful with large Database contents, ie with a large numbers of tuples, like "entity/edit/Agreement/10000, etc.
# -- The same principle can be extended to other cases similar to "entity/" URIs (harcoded or using similar properties).
# -- Default is 3
csrf.entity.request.limit=
# -- CSRF defense strategy.
# -- Because OFBiz OOTB also sets the SameSite attribute to 'strict' for all cookies,
# -- which is an effective CSRF defense,
# -- default is org.apache.ofbiz.security.NoCsrfDefenseStrategy if not specified.
# -- Use org.apache.ofbiz.security.CsrfDefenseStrategy
# -- if you need to use a 'lax' for SameSiteCookieAttribute
csrf.defense.strategy=
There is also a SystemProperty in SSOJWTDemoData.xml:
<SystemProperty systemResourceId="security" systemPropertyId="SameSiteCookieAttribute" systemPropertyValue="strict"/>12.4. Impersonation
12.4.1. What is Impersonation in Apache OFBiz
The Apache OFBiz Project Release trunk
Introduction to User impersonation
User Impersonation is a feature that offer a way to select a user login and impersonate it, i.e. see what the user could see navigating through the application in his name.
How do this work ?
An authorized user (see security and controls section for configuration), can select a user that will be impersonated.
The impersonation start, if everything is well configured, in current application (partymgr for the demo). Everything appears like if we were logged in with the userLoginId and the valid password (though we know nothing about it)
The only thing showing that we currently are impersonating a user is the little bottom-right image :

This icon indicates, when clicking on it, the user impersonated, and offer a way to depersonate.
The impersonate period is stored for audit purpose, and if the impersonator forgot to depersonate, the period is terminated one hour after impersonation start.
Security
This feature can draw some concerns about security aspect. This paragraph will introduce every controls and properties that have been implemented around the impersonation feature.
| These configuration steps are not to be neglected for a production environment since this feature offer a way to act in place of another user. |
Properties
The security.properties file introduce two properties that control impersonation feature :
security.disable.impersonation = trueThis property, set by default to true, controls the activation of impersonation feature. If no configuration is done any user trying to use impersonation will face an error message, indicating that the feature is disabled.
To enable impersonation this property need to be set to false
security.login.authorised.during.impersonate = falseThis property controls the way impersonation occurred to the impersonated user :
In default configuration, the impersonated user see nothing and can use the application without knowing that he is currently impersonated. Several authorized user can impersonate a same login without any issue.
| This configuration is intended for testing/QA environment allowing any authorized user to impersonate a login to validate its configuration, test the application etc. |
Set to true, this configuration improve the control of the data generated by the impersonated user. Indeed, Only one authorized user can impersonate a login at the same time, and during the impersonation process, the impersonated user is unable to act within the application.
Since the impersonation period is stored in database, the actions done by the authorized user can be identified if there is the need to do so.
| This configuration is intended for production environment |
Controls
- The permission
-
First, to be able to use impersonation, a user need to possess IMPERSONATE_ADMIN permissions. Demo data offer IMPERSONATION security group for this purpose.
In demo data, FULLADMIN security group also possess the permission. - Permission based user restriction
-
An authorized user cannot impersonate any user. There are two main controls that will restrict the impersonation feature.
- Cannot impersonate Admin user
-
It is impossible to impersonate a user that is granted any of the admin permission :
"IMPERSONATE_ADMIN"
"ARTIFACT_INFO_VIEW"
"SERVICE_MAINT"
"ENTITY_MAINT"
"UTIL_CACHE_VIEW"
"UTIL_DEBUG_VIEW"
- Cannot impersonate more privileged user
-
It is impossible to impersonate a user that has more permission than your user. Even if the missing persmission is a minor one.
12.5. Gradle Dependency Verification
The Apache OFBiz Project Release trunk
| This feature is for now disabled. You may use it locally if you want… |
As it’s a long read you might prefer this summary:
| the dependency verification is an incubating feature. So we will wait before backporting from trunk… |
By default OFBiz comes with OOTB Gradle dependency verification.
This means that it embeds a verification-metadata.xml file and a verification-keyring.gpg in OFBiz gradle sub-directory which is used during builds and other tasks to verify dependencies.
These files are initially created using :
|
gradlew --write-verification-metadata pgp,sha256 help gradlew --write-verification-metadata pgp,sha256 --export-keys |
These command creates or updates the verification-metadata.xml and verification-keyring.gpg files which respectively contains the checksums for each of declared dependencies and the related keys
Currently the status is it’s incomplete in OFBiz. You get this message:
-
Some artifacts aren’t signed or the signature couldn’t be retrieved.
-
Some signature verification failed. Checksums were generated for those artifacts but you MUST check if there’s an actual problem. Look for entries with the following comment: PGP verification failed PGP verification failed
Only 6 keys are concerned. This does not prevent the verification to work using metadata, though it’s better to check the situation in case of doubts (OK OTTB). You may use
| gradlew build --refresh-keys |
To recreate the keys
The verification-metadata.xml file contains 2 entries that can be set to true or false to check or ignore the 2 functionalities:
|
<verify-metadata>true</verify-metadata> <verify-signatures>true</verify-signatures> |
Finally, you may refer to https://issues.apache.org/jira/browse/OFBIZ-12186 for more information.
13. Appendices
14. Apache OFBiz Plugins for Developer
The Apache OFBiz Project
14.1. Deployment
14.1.1. OFBiz Single Sign On using CAS and LDAP
Setup the Java Key Store
From the directory in which you want to create the keystore, run keytool with the following parameters.
-
Generate the server certificate.
$ keytool -genkey -alias tomcat -keyalg RSA -keypass changeit -storepass changeit -keystore keystore.jksWhen you press Enter, keytool prompts you to enter the server name, organizational unit, organization, locality, state, and country code.
Note that you must enter the server name in response to keytool’s first prompt, in which it asks for first and last names. For testing purposes, this can be localhost.
-
Export the generated server certificate in keystore.jks into the file server.cer.
$ keytool -export -alias tomcat -storepass changeit -file server.cer -keystore keystore.jks -
To create the trust-store file cacerts.jks and add the server certificate to the trust-store, run keytool from the directory where you created the keystore and server certificate. Use the following parameters:
$ keytool -import -v -trustcacerts -alias tomcat -file server.cer -keystore cacerts.jks -keypass changeit -storepass changeit -
Information on the certificate, such as that shown next, will display.
$ keytool -import -v -trustcacerts -alias tomcat -file server.cer -keystore cacerts.jks -keypass changeit -storepass changeit Owner: CN=localhost, OU=Sun Micro, O=Docs, L=Santa Clara, ST=CA, C=US Issuer: CN=localhost, OU=Sun Micro, O=Docs, L=Santa Clara, ST=CA, C=US Serial number: 3e932169 Valid from: Tue Apr 08 Certificate fingerprints: MD5: 52:9F:49:68:ED:78:6F:39:87:F3:98:B3:6A:6B:0F:90 SHA1: EE:2E:2A:A6:9E:03:9A:3A:1C:17:4A:28:5E:97:20:78:3F: Trust this certificate? [no]: -
Enter yes, and then press the Enter or Return key. The following information displays:
    Certificate was added to keystore
    [Saving cacerts.jks]
CAS Server
-
Download CAS server from the CAS web site.
-
Deploy cas-server-webapp-[version].war to Tomcat
-
Set key store file to Tomcat
keystoreFile="path/to/keystore.jks" -
Start Tomcat
OFBiz Certificate
Set trust store’s file to Java Virtual Machine (JVM) before start OFBiz.
-Djavax.net.ssl.trustStore=path/to/cacerts.jksLDAP Component
OFBiz uses the LDAP component in the plugins to check the security in a web application.
LDAP Properties
LDAP properties file is plugins/ldap/config/ldap.xml.
You can change a filter condition you want.
-
Attribute : LDAP attbitue for filter e.g. uid=%u
-
AuthenType : LDAP authentication method e.g. simple
-
AuthenticaionHandler : CAS handler class e.g. org.apache.ofbiz.ldap.cas.OFBizCasAuthenticationHandler
-
AutoPartyId : Party’s id for user login e.g. admin
-
AutoSecurityGroupId : Security group’s id for user login e.g. FULLADMIN
-
BaseDN : The top level ofbiz LDAP directory tree e.g. dc=example,dc=com
-
Filter : LDAP search filter e.g. (objectclass=*)
-
Scope : LDAP search scope parameter e.g. sub,one, etc.
-
URL : LDAP server’s url e.g. ldap://localhost:389
-
UserOFBizLoginWhenLDAPFail : indicate that if LDAP fail then login with normal OFBiz’s user or not. (true/false)
-
CasLoginUri : URI to CAS login e.g. /login
-
CasLogoutUri : URI to CAS logout e.g. /logout
-
CasUrl : CAS Server’s URL e.g. https://localhost:8443/cas
-
CasValidateUri : URI to CAS validate e.g. /validate
-
CasLdapHandler : LDAP hanlder class e.g. org.apache.ofbiz.ldap.openldap.OFBizLdapAuthenticationHandler
-
CasTGTCookieName : CAS TGT’s cookie name e.g. CASTGC
OpenLDAP
The LDAP component need data from LDAP server (OpenLDAP). The server needs to install, configure and populate OpenLDAP: see at the OpenLDAP web site.
Web Application Security Mapping
Every web application you need to use LDAP (single sign on) feature, you need to change the event’s path of some the security request mappings to org.apache.ofbiz.ldap.LdapLoginWorker class.
checkLogin
    <request-map uri="checkLogin" edit="false">
        <description>Verify a user is logged in.</description>
        <security https="true" auth="false"/>
        <event type="java" path="org.apache.ofbiz.ldap.LdapLoginWorker" invoke="checkLogin"/>
        <response name="success" type="view" value="main"/>
        <response name="error" type="view" value="login"/>
    </request-map>
login
    <request-map uri="login">
        <security https="true" auth="false"/>
        <event type="java" path="org.apache.ofbiz.ldap.LdapLoginWorker" invoke="login"/>
        <response name="success" type="view" value="main"/>
        <response name="requirePasswordChange" type="view" value="requirePasswordChange"/>
        <response name="error" type="view" value="login"/>
    </request-map>
logout
    <request-map uri="logout">
            <security https="true" auth="true"/>
            <event type="java" path="org.apache.ofbiz.ldap.LdapLoginWorker" invoke="logout"/>
            <response name="success" type="request-redirect" value="main"/>
            <response name="error" type="view" value="main"/>
    </request-map>