This documentation is for an unreleased version of Apache Flink CDC. We recommend you use the latest stable version.
Building a Real-time Data Lake with Flink CDC
Using Flink CDC to synchronize data from MySQL sharding tables and build real-time data lake #
For OLTP databases, to deal with a huge number of data in a single table, we usually do database and table sharding to get better throughput. But sometimes, for convenient analysis, we need to merge them into one table when loading them to data warehouse or data lake.
This tutorial will show how to use Flink CDC to build a real-time data lake for such a scenario. You can walk through the tutorial easily in the docker environment. The entire process uses standard SQL syntax without a single line of Java/Scala code or IDE installation.
The following sections will take the pipeline from MySQL to Iceberg as an example. The overview of the architecture is as follows:

You can also use other data sources like Oracle/Postgres and sinks like Hudi to build your own pipeline.
Preparation #
Prepare a Linux or MacOS computer with Docker installed.
Preparing JAR package required #
Download links are available only for stable releases, SNAPSHOT dependencies need to be built based on master or release-branches by yourself.
- flink-sql-connector-mysql-cdc-3.0-SNAPSHOT.jar
- flink-shaded-hadoop-2-uber-2.7.5-10.0.jar
- iceberg-flink-runtime-1.16-1.3.1.jar
Starting components required #
The components required in this tutorial are all managed in containers, so we will use docker-compose to start them.
-
Create
Dockerfilefile using following contents:FROM flink:1.16.0-scala_2.12 # Place the downloaded jar packages in the lib directory at the same level. COPY ./lib /opt/flink/lib RUN apt-get update && apt-get install tree -
Create
docker-compose.ymlfile using following contents:version: '2.1' services: sql-client: user: flink:flink build: . command: bin/sql-client.sh depends_on: - jobmanager - mysql environment: - MYSQL_HOST=mysql - | FLINK_PROPERTIES= jobmanager.rpc.address: jobmanager rest.address: jobmanager volumes: - shared-tmpfs:/tmp/iceberg jobmanager: user: flink:flink build: . ports: - "8081:8081" command: jobmanager environment: - | FLINK_PROPERTIES= jobmanager.rpc.address: jobmanager volumes: - shared-tmpfs:/tmp/iceberg taskmanager: user: flink:flink build: . depends_on: - jobmanager command: taskmanager environment: - | FLINK_PROPERTIES= jobmanager.rpc.address: jobmanager taskmanager.numberOfTaskSlots: 2 volumes: - shared-tmpfs:/tmp/iceberg mysql: image: debezium/example-mysql:1.1 ports: - "3306:3306" environment: - MYSQL_ROOT_PASSWORD=123456 - MYSQL_USER=mysqluser - MYSQL_PASSWORD=mysqlpw volumes: shared-tmpfs: driver: local driver_opts: type: "tmpfs" device: "tmpfs"The Docker Compose environment consists of the following containers:
- SQL-Client: Flink SQL Client, used to submit queries and visualize their results.
- Flink Cluster: a Flink JobManager and a Flink TaskManager container to execute queries.
- MySQL: mainly used as a data source to store the sharding table.
-
To start all containers, run the following command in the directory that contains the
docker-compose.ymlfile:docker-compose up -dThis command automatically starts all the containers defined in the Docker Compose configuration in a detached mode. Run
docker psto check whether these containers are running properly. We can also visit http://localhost:8081/ to see if Flink is running normally.
Note:
- If you want to run with your own Flink environment, remember to download the jar packages and then put them to
FLINK_HOME/lib/. - All the following commands involving
docker-composeshould be executed in the directory of thedocker-compose.ymlfile.

Preparing data in databases #
-
Enter mysql’s container:
docker-compose exec mysql mysql -uroot -p123456 -
Create databases/tables and populate data:
Create a logical sharding table
usersharded in different databases and tables physically.CREATE DATABASE db_1; USE db_1; CREATE TABLE user_1 ( id INTEGER NOT NULL PRIMARY KEY, name VARCHAR(255) NOT NULL DEFAULT 'flink', address VARCHAR(1024), phone_number VARCHAR(512), email VARCHAR(255) ); INSERT INTO user_1 VALUES (110,"user_110","Shanghai","123567891234","user_110@foo.com"); CREATE TABLE user_2 ( id INTEGER NOT NULL PRIMARY KEY, name VARCHAR(255) NOT NULL DEFAULT 'flink', address VARCHAR(1024), phone_number VARCHAR(512), email VARCHAR(255) ); INSERT INTO user_2 VALUES (120,"user_120","Shanghai","123567891234","user_120@foo.com");CREATE DATABASE db_2; USE db_2; CREATE TABLE user_1 ( id INTEGER NOT NULL PRIMARY KEY, name VARCHAR(255) NOT NULL DEFAULT 'flink', address VARCHAR(1024), phone_number VARCHAR(512), email VARCHAR(255) ); INSERT INTO user_1 VALUES (110,"user_110","Shanghai","123567891234", NULL); CREATE TABLE user_2 ( id INTEGER NOT NULL PRIMARY KEY, name VARCHAR(255) NOT NULL DEFAULT 'flink', address VARCHAR(1024), phone_number VARCHAR(512), email VARCHAR(255) ); INSERT INTO user_2 VALUES (220,"user_220","Shanghai","123567891234","user_220@foo.com");
Creating tables using Flink DDL in Flink SQL CLI #
First, use the following command to enter the Flink SQL CLI Container:
docker-compose run sql-client
We should see the welcome screen of the CLI client:

Then do the following steps in Flink SQL CLI:
-
Enable checkpoints every 3 seconds
Checkpoint is disabled by default, we need to enable it to commit Iceberg transactions. Besides, the beginning of mysql-cdc binlog phase also requires waiting a complete checkpoint to avoid disorder of binlog records.
-- Flink SQL Flink SQL> SET execution.checkpointing.interval = 3s; -
Create MySQL sharding source table
Create a source table that captures the data from the logical sharding table
user. Here, we use regex to match all the physical tables. Besides, the table defines metadata column to identify which database/table the record comes from.-- Flink SQL Flink SQL> CREATE TABLE user_source ( database_name STRING METADATA VIRTUAL, table_name STRING METADATA VIRTUAL, `id` DECIMAL(20, 0) NOT NULL, name STRING, address STRING, phone_number STRING, email STRING, PRIMARY KEY (`id`) NOT ENFORCED ) WITH ( 'connector' = 'mysql-cdc', 'hostname' = 'mysql', 'port' = '3306', 'username' = 'root', 'password' = '123456', 'database-name' = 'db_[0-9]+', 'table-name' = 'user_[0-9]+' ); -
Create Iceberg sink table
Create a sink table
all_users_sinkused to load data to Iceberg. We definedatabase_name,table_nameandidas a combined primary key, becauseidmaybe not unique across different databases and tables.-- Flink SQL Flink SQL> CREATE TABLE all_users_sink ( database_name STRING, table_name STRING, `id` DECIMAL(20, 0) NOT NULL, name STRING, address STRING, phone_number STRING, email STRING, PRIMARY KEY (database_name, table_name, `id`) NOT ENFORCED ) WITH ( 'connector'='iceberg', 'catalog-name'='iceberg_catalog', 'catalog-type'='hadoop', 'warehouse'='file:///tmp/iceberg/warehouse', 'format-version'='2' );
Streaming to Iceberg #
-
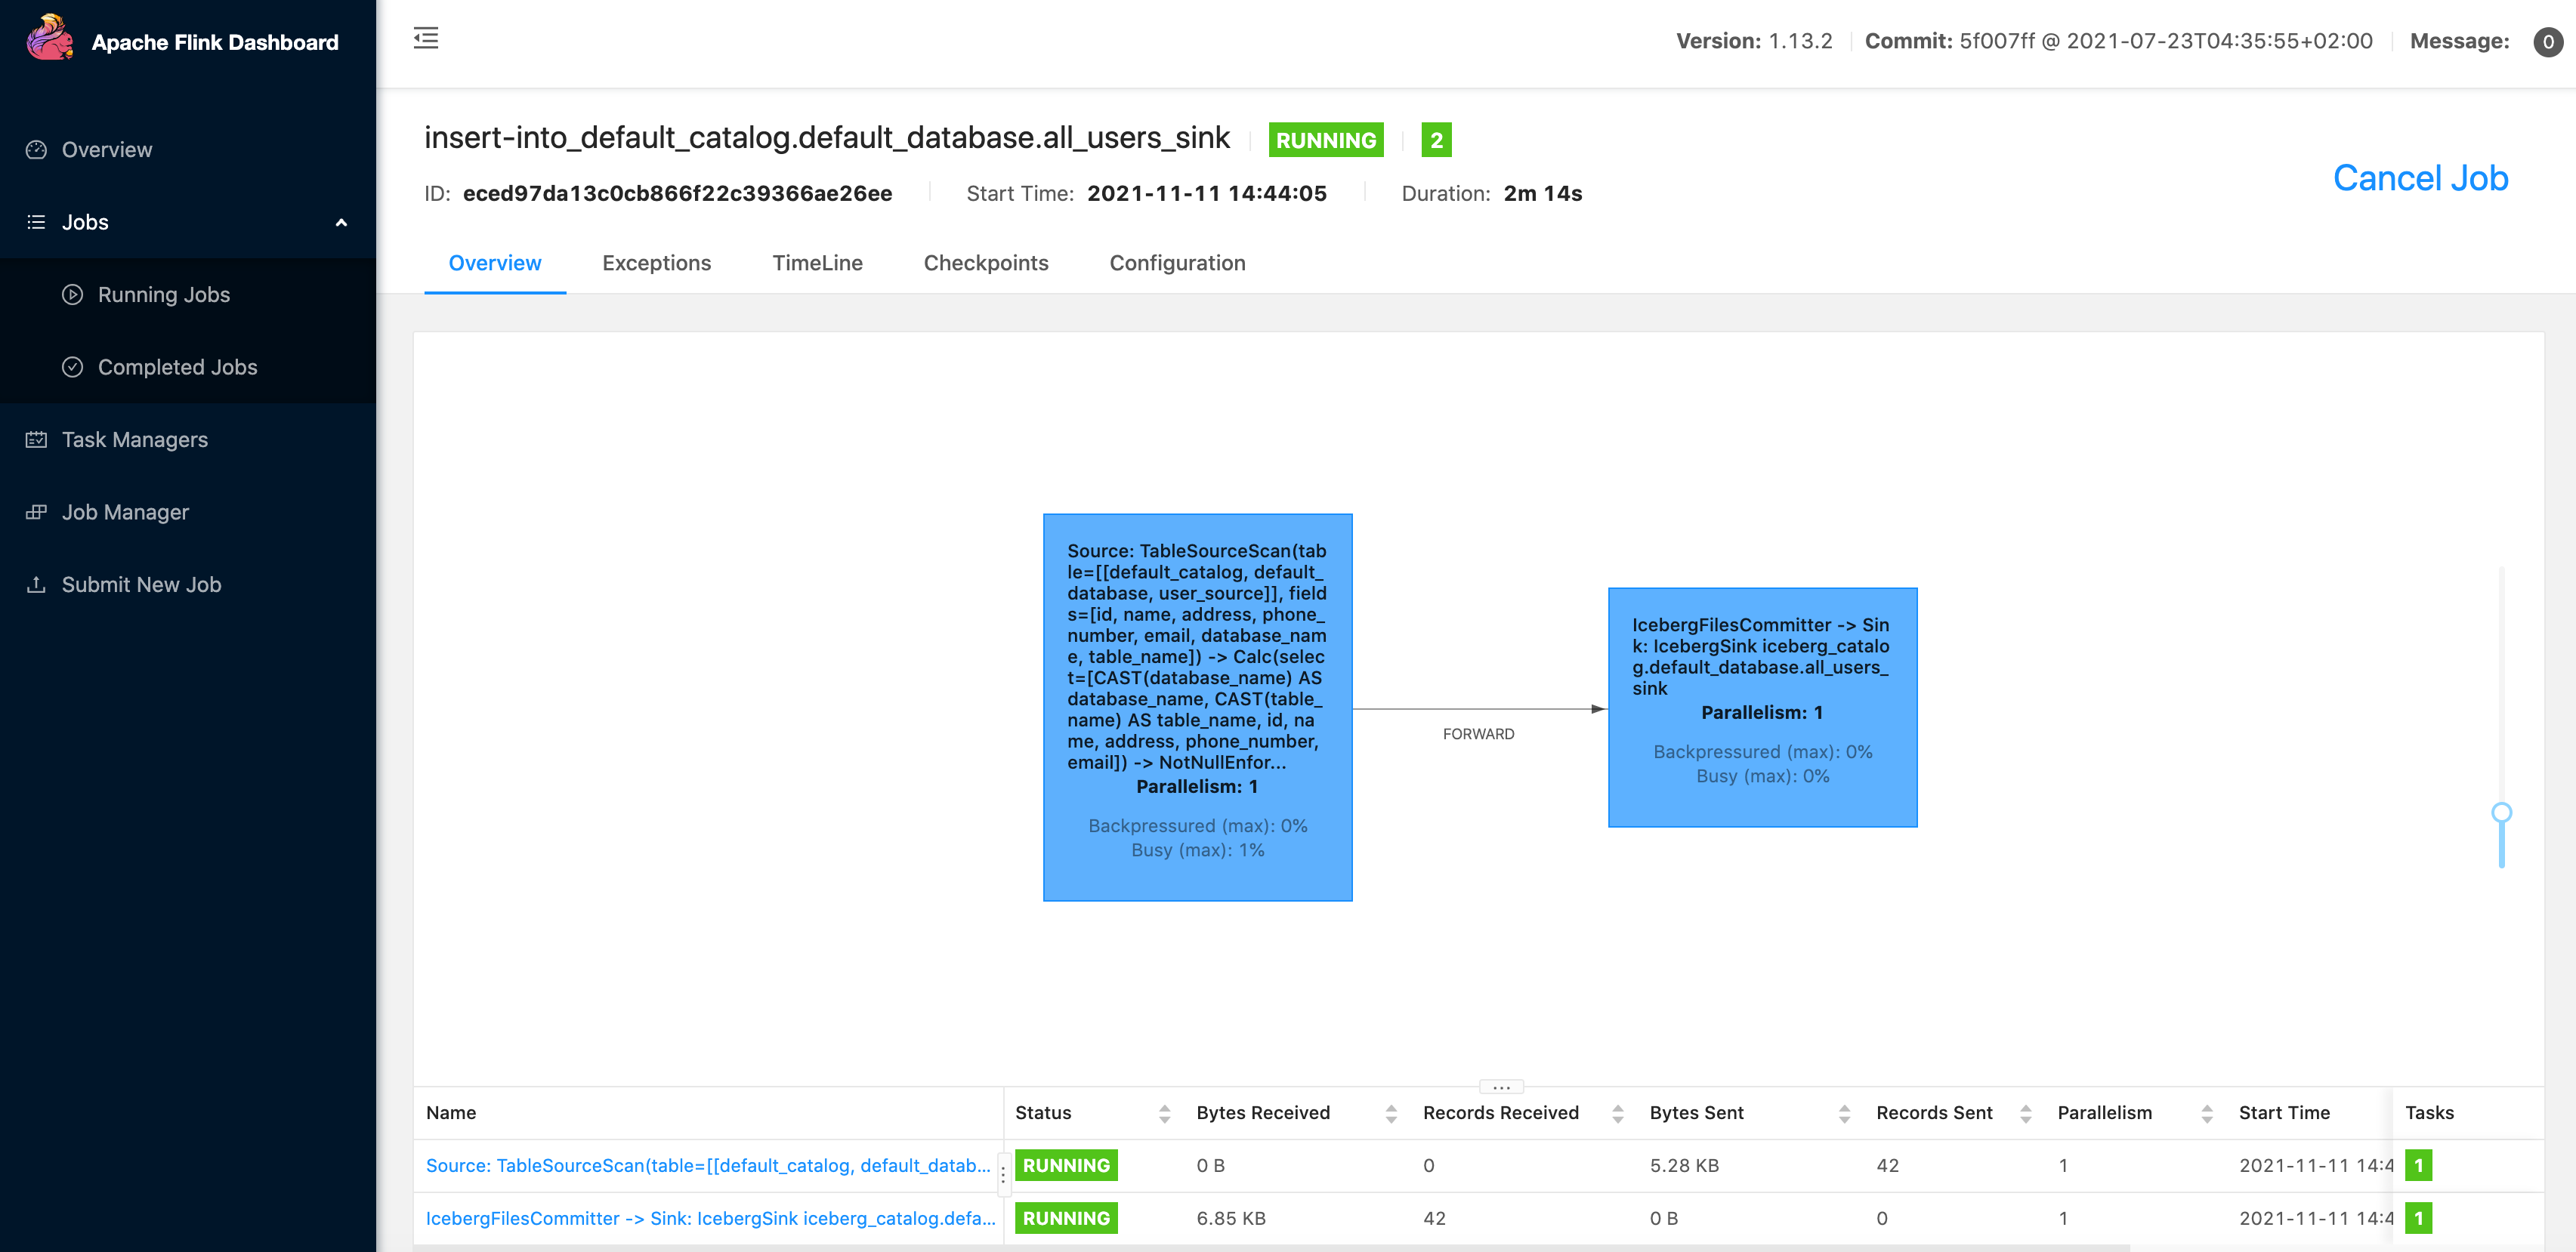
Streaming write data from MySQL to Iceberg using the following Flink SQL:
-- Flink SQL
Flink SQL> INSERT INTO all_users_sink select * from user_source;
It will start a streaming job which will synchronize historical and incremental data from MySQL to Iceberg continuously. The running job can be found in Flink UI, and it looks like:
Then, we can use the following command to see the files written to Iceberg:
docker-compose exec sql-client tree /tmp/iceberg/warehouse/default_database/It should look like:
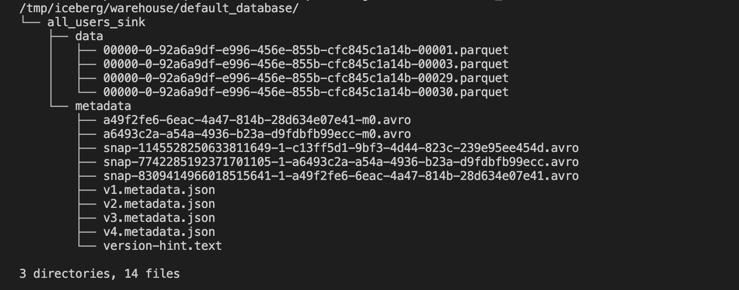
The actual files may differ in your environment, but the structure of the directory should be similar.
-
Use the following Flink SQL to query the data written to
all_users_sink:-- Flink SQL Flink SQL> SELECT * FROM all_users_sink;We can see the data queried in the Flink SQL CLI:

-
Make some changes in the MySQL databases, and then the data in Iceberg table
all_users_sinkwill also change in real time.(3.1) Insert a new user in table
db_1.user_1--- db_1 INSERT INTO db_1.user_1 VALUES (111,"user_111","Shanghai","123567891234","user_111@foo.com");(3.2) Update a user in table
db_1.user_2--- db_1 UPDATE db_1.user_2 SET address='Beijing' WHERE id=120;(3.3) Delete a user in table
db_2.user_2--- db_2 DELETE FROM db_2.user_2 WHERE id=220;After executing each step, we can query the table
all_users_sinkusingSELECT * FROM all_users_sinkin Flink SQL CLI to see the changes.The final query result is as follows:

From the latest result in Iceberg, we can see that there is a new record of
(db_1, user_1, 111), and the address of(db_1, user_2, 120)has been updated toBeijing. Besides, the record of(db_2, user_2, 220)has been deleted. The result is exactly the same with the changes we did in MySQL.


Clean up #
After finishing the tutorial, run the following command in the directory of docker-compose.yml to stop all containers:
docker-compose down